
If you are searching for a truly indulgent and festive treat, look no further than the Christmas Nutella Fudge: 5 Magical Steps to Bliss Recipe. This luscious fudge perfectly captures the comforting richness of Nutella, combined with creamy condensed milk, silky chocolate, and a hint of vanilla, bringing a harmonious balance of flavor and texture that is simply irresistible. Whether you’re gifting it to loved ones or keeping it all to yourself, this fudge will sparkle on any holiday dessert table with its smooth, velvety bite and delightful nutty crunch if you decide to add nuts. Get ready to experience a holiday classic reborn in five magical steps that are as fun as they are foolproof.
Ingredients You’ll Need
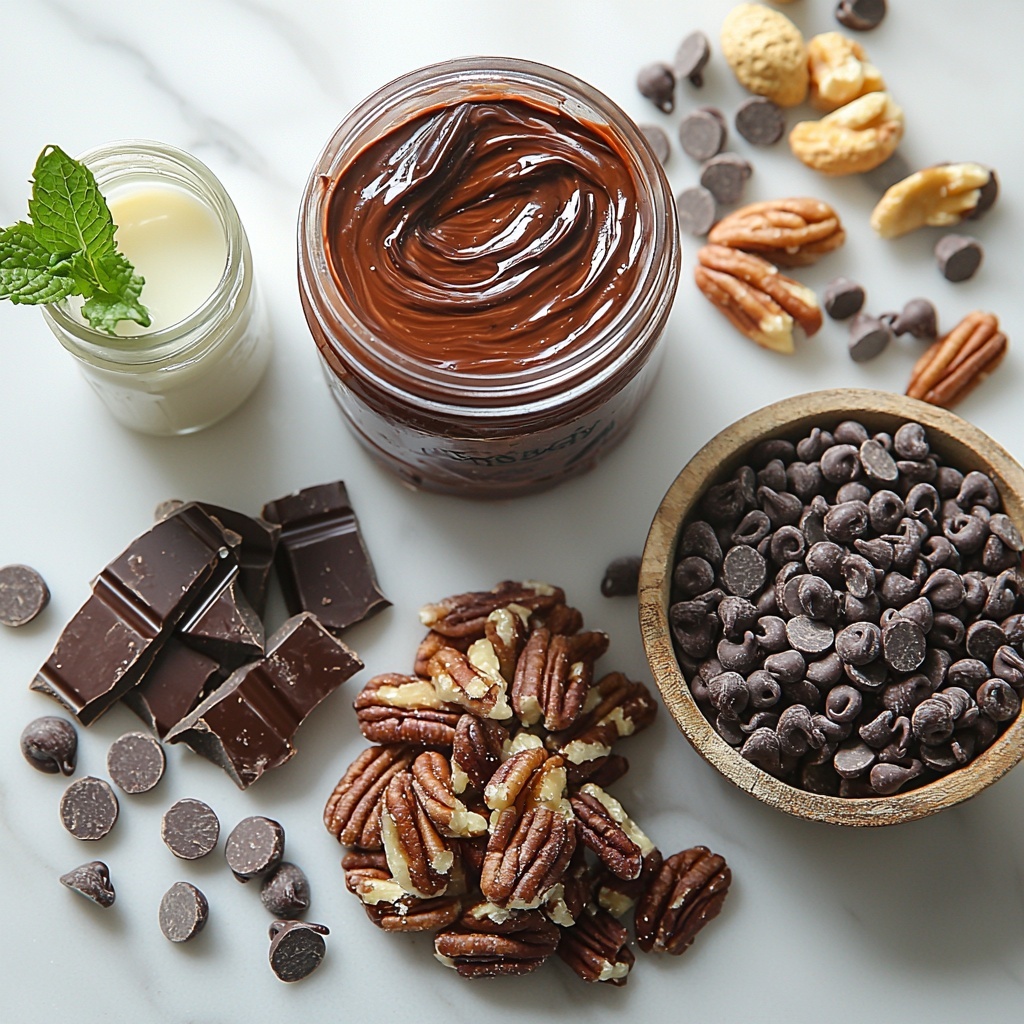
These ingredients are wonderfully simple, yet each one plays an essential role in creating the perfect fudgy texture and the rich, mouthwatering taste that defines the Christmas Nutella Fudge: 5 Magical Steps to Bliss Recipe. From the creamy Nutella to the luscious condensed milk and the deep chocolate flavor, every element works together to form a festive delight.
- 2 cups Nutella: The star ingredient that gives the fudge its signature hazelnut and chocolate flavor, making it irresistibly creamy.
- 1 cup sweetened condensed milk: Adds sweetness and smoothness, ensuring the fudge has that perfect melt-in-your-mouth quality.
- 2 cups chocolate chips: Enhances the chocolate depth and helps achieve a luscious, fudgy texture once melted.
- 1 teaspoon vanilla extract: A splash of warmth and aromatic complexity that elevates all the chocolate flavors.
- 1/2 cup chopped nuts (optional): Adds a delightful crunch and festive texture contrast if you love a bit of nuttiness in your fudge.
How to Make Christmas Nutella Fudge: 5 Magical Steps to Bliss Recipe
Step 1: Gently Combine Nutella and Condensed Milk
Begin by placing your Nutella and sweetened condensed milk into a saucepan over low heat. The key here is patience—slowly warming these together allows the Nutella’s rich hazelnut flavors to meld beautifully with the sweet and creamy condensed milk. Stir continuously to prevent sticking or burning until the mixture is smooth and homogenous.
Step 2: Stir Until Smooth and Combined
The magic starts to take shape as you blend the ingredients until silky and cohesive. This ensures your fudge will have an even texture without lumps, setting the stage for that dreamy melt-in-your-mouth finish everyone loves.
Step 3: Add Chocolate Chips and Vanilla
Now, toss in those chocolate chips and the teaspoon of vanilla extract. Stir gently until the chips melt completely, creating an extra layer of chocolatey richness and a subtle vanilla undertone that rounds out every bite. This step is crucial for depth and flavor complexity.
Step 4: Fold in Chopped Nuts (Optional)
If you’re a fan of added texture, this is the moment to fold in those chopped nuts. They bring a satisfying crunch and a festive feel to your fudge, but feel free to skip this if you prefer a smooth, velvety treat.
Step 5: Pour and Chill
Finally, pour your glossy Nutella-chocolate mixture into a lined baking dish, smoothing the top with a spatula. Refrigerate for at least 4 hours until fully set—this wait is pure anticipation as the fudge transforms into firm, sliceable perfection. Once chilled, cut it into beautiful squares and get ready to be wowed!
How to Serve Christmas Nutella Fudge: 5 Magical Steps to Bliss Recipe
Garnishes
For an extra special touch, garnish your squares with a sprinkle of sea salt flakes or a dusting of powdered sugar. Freshly chopped hazelnuts or edible gold dust can also add a festive sparkle that catches the eye and entices the palate.
Side Dishes
While each bite of this fudge stands beautifully on its own, pairing it with a cup of robust coffee, rich hot chocolate, or even a glass of cold milk can elevate the experience. It’s wonderful alongside holiday cookies or fresh fruit for a delightful dessert platter.
Creative Ways to Present
Consider wrapping individual fudge squares in festive parchment paper or placing them in small decorative boxes for charming gifts. Stack them on a tiered server surrounded by pine sprigs or cinnamon sticks to create a visually stunning centerpiece for your holiday celebrations.
Make Ahead and Storage
Storing Leftovers
Leftover fudge keeps beautifully when stored in an airtight container in the refrigerator for 3-4 days. The cool environment preserves the texture and flavor, so every bite tastes just as fresh as the first.
Freezing
If you want to keep your fudge around longer or prepare in advance, you can freeze it for up to 1 month. Wrap squares tightly in wax paper and place them in an airtight container or freezer bag to prevent freezer burn and preserve the luscious taste.
Reheating
Because fudge is best enjoyed cool and set, reheating is generally not recommended. Instead, allow frozen pieces to thaw in the fridge for a few hours before serving to maintain the ideal texture and flavor.
FAQs
Can I use a different chocolate spread instead of Nutella?
Absolutely! While Nutella provides that signature hazelnut and chocolate flavor, you can substitute it with other chocolate-hazelnut spreads or even plain chocolate spreads, though the flavor profile will slightly differ.
Do I have to add nuts to the fudge?
The nuts are entirely optional. Leaving them out creates a smoother fudge, but if you enjoy a little crunch and an extra texture dimension, adding chopped nuts really enhances the experience.
How long does it take for the fudge to set properly?
The fudge needs to chill in the refrigerator for at least 4 hours in order to firm up and be cut into perfect squares. Patience here guarantees that divine fudgy consistency.
Can I make this fudge ahead of time for holiday gatherings?
Definitely! This fudge is a fantastic make-ahead dessert. Prepare it up to a week in advance and store it refrigerated in an airtight container to keep it fresh until serving time.
What is the best way to cut the fudge without it crumbling?
Use a sharp knife warmed under hot water and then dried before cutting to make clean, smooth cuts. Wiping the knife between slices helps keep the fudge edges neat and tidy.
Final Thoughts
There is something truly magical about the Christmas Nutella Fudge: 5 Magical Steps to Bliss Recipe that makes every holiday moment sweeter and cozier. It’s simple enough to whip up with minimal fuss but delivers maximum delight in every bite. I can’t wait for you to share this irresistible treat with your family and friends — trust me, it will become a cherished holiday tradition before you know it!
Print
Christmas Nutella Fudge: 5 Magical Steps to Bliss Recipe
- Prep Time: 10 minutes
- Cook Time: 10 minutes
- Total Time: 4 hours 20 minutes
- Yield: 24 servings
- Category: Dessert
- Method: Stovetop
- Cuisine: American
Description
This Christmas Nutella Fudge is a decadent, easy-to-make treat perfect for the holiday season. Combining rich Nutella, sweetened condensed milk, and chocolate chips, this fudge is smooth, creamy, and delightfully chocolatey. Optionally enhanced with chopped nuts for added texture, this festive dessert sets in the refrigerator and can be sliced into perfect squares for sharing or gifting.
Ingredients
Fudge Mixture
- 2 cups Nutella
- 1 cup sweetened condensed milk
- 2 cups chocolate chips
- 1 teaspoon vanilla extract
Optional Add-ins
- 1/2 cup chopped nuts (optional, such as walnuts or pecans)
Instructions
- Combine Nutella and sweetened condensed milk: In a saucepan, place 2 cups of Nutella and 1 cup of sweetened condensed milk over low heat. Warm the mixture gently while stirring to prevent scorching, ensuring both ingredients start to melt together.
- Stir until smooth: Continuously stir the mixture over low heat until it becomes smooth and fully combined without any lumps, creating a creamy base for the fudge.
- Add chocolate chips and vanilla extract: Add 2 cups of chocolate chips and 1 teaspoon of vanilla extract to the saucepan. Stir continuously until the chocolate chips have completely melted and the mixture is luscious and uniform.
- Fold in chopped nuts (optional): If you are including nuts, gently fold in 1/2 cup of chopped nuts of your choice to add crunch and flavor to the fudge mixture.
- Set the fudge: Pour the mixture into a baking dish lined with parchment paper or foil. Spread it evenly, then refrigerate for at least 4 hours until the fudge is firm and set.
- Cut and serve: Once set, remove the fudge from the dish, cut into squares, and serve. Store leftovers refrigerated in an airtight container.
Notes
- Use parchment paper or foil to line the baking dish for easy removal of fudge.
- Feel free to substitute the chopped nuts with your favorite nuts or omit them if preferred.
- The fudge will keep refrigerated for up to one week in an airtight container.
- If you prefer a firmer texture, refrigerate for longer than 4 hours before cutting.
- For a nut-free version, simply skip the nuts entirely.


