
Imagine biting into a delightfully soft and chocolatey cookie crowned with a creamy peanut butter filling and a crunchy peanut coating This Peanut Butter Chocolate Thumbprint Cookies Recipe is one of my all-time favorites for satisfying any sweet tooth craving while delivering a perfect balance of textures and flavors Each bite melts in your mouth with rich cocoa, nutty goodness, and a luscious chocolate drizzle that feels like an indulgent hug in cookie form
Ingredients You’ll Need
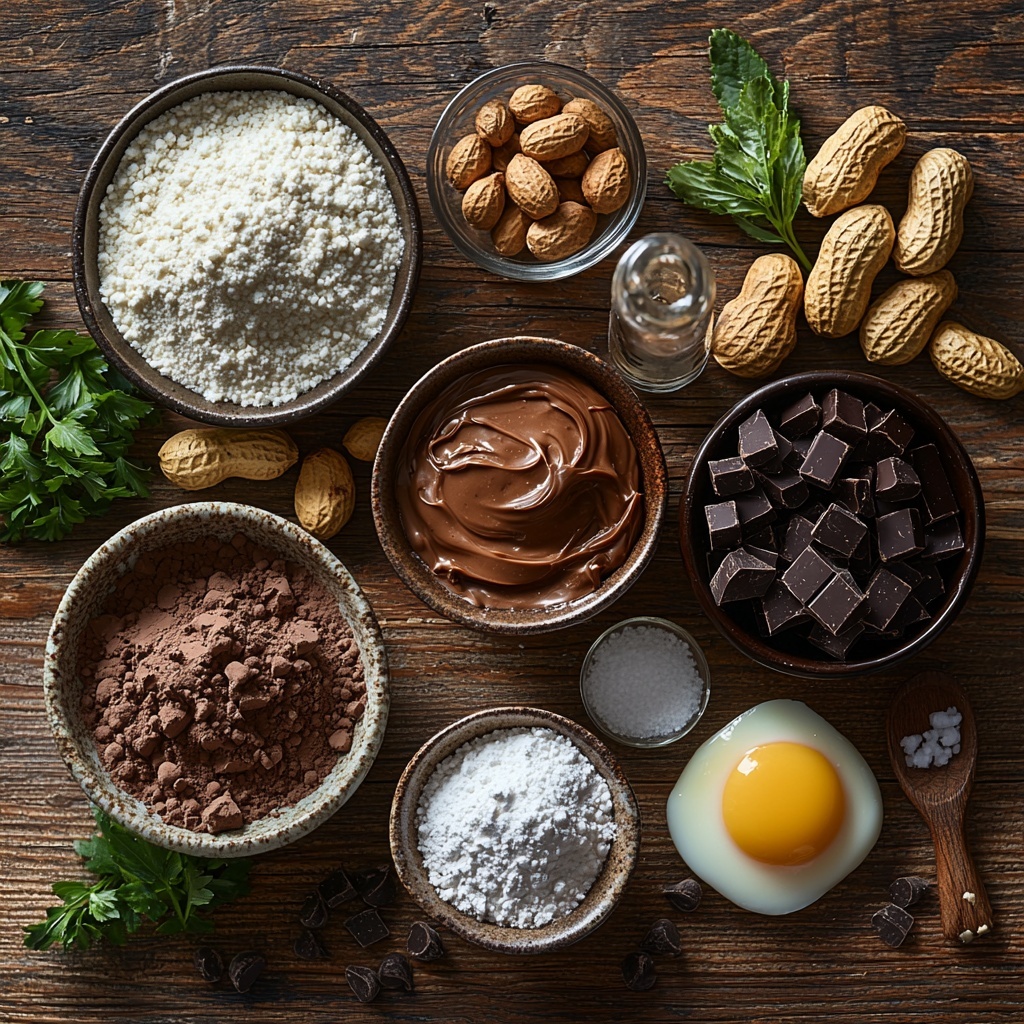
These ingredients are simple yet powerful, coming together to create the ultimate flavor and texture experience From the rich cocoa to the creamy peanut butter and crunchy chopped peanuts, each element plays a starring role in making these thumbprint cookies irresistible
- 1 cup All-purpose flour: Provides structure for a tender cookie with just the right bite
- 1/2 cup Cocoa powder: Adds deep chocolate flavor and a beautiful dark color
- 1/4 teaspoon Salt: Balances sweetness and enhances all the flavors
- 1/2 cup Unsalted butter (softened): Creates a rich, creamy base for a soft, melt-in-your-mouth texture
- 2/3 cup Sugar: Sweetens the dough and helps achieve a light, fluffy consistency
- 1 Egg (separated): Egg yolk enriches the dough while the leftover egg white helps the peanuts stick perfectly
- 2 Tablespoons Milk: Keeps the dough moist and tender
- 1 teaspoon Vanilla extract: Infuses a warm aroma and enhances the overall flavor
- 1 cup Peanuts (finely chopped): Provides a satisfying crunch and deep nutty taste
- 1 cup Peanut Butter: The star of the filling, creamy and luscious
- ¼ cup Powdered sugar: Smoothly sweetens the peanut butter filling
- ½ cup Chocolate Chips: Melts into a glossy drizzle that adds a rich finishing touch
How to Make Peanut Butter Chocolate Thumbprint Cookies Recipe
Step 1: Combine Dry Ingredients
Start by whisking together the flour, cocoa powder, and salt in a small bowl This ensures each bite packs an even chocolate punch and lays the foundation for a perfectly balanced dough
Step 2: Cream Butter and Sugar
In a large mixing bowl, beat the softened butter and sugar until light and fluffy, about five minutes This step is key to achieving that tender, melt-in-your-mouth texture we all love in thumbprint cookies
Step 3: Add Wet Ingredients
Mix in the egg yolk, milk, and vanilla extract, stirring gently until the egg is fully incorporated This blend adds richness and moisture to the dough, making each cookie soft yet sturdy enough to hold the filling
Step 4: Incorporate Dry Ingredients
Add the flour mixture gradually, half a cup at a time, mixing just until the dough comes together This careful approach prevents overworking the dough and keeps your cookies tender rather than tough
Step 5: Chill the Dough
Cover your dough with plastic wrap and refrigerate for an hour Chilling firms up the dough, making it easier to shape and helping the cookies maintain their form during baking
Step 6: Preheat the Oven
Set your oven to 350 degrees Fahrenheit to get it nice and ready while your dough chills This ensures even cooking and the perfect cookie texture
Step 7: Shape the Cookies
Roll chilled dough into 1-inch balls, each about 1½ tablespoons This uniform size helps the cookies bake evenly and look picture perfect
Step 8: Coat with Peanuts
Dip the bottom half of each dough ball in the reserved egg white, then roll into chopped peanuts Press gently so the peanuts stick and add a delightful crunch and nutty flavor to every bite
Step 9: Make Indentations
Use the back of a teaspoon to press a deep indentation into the center of each cookie These thumbprints will cradle the creamy peanut butter filling, making each bite extra special
Step 10: Bake to Perfection
Bake your cookies for 10 to 12 minutes until they’re just set and slightly firm around the edges but still soft in the middle This baking time locks in tenderness with a rich chocolate flare
Step 11: Deepen Indentations if Needed
Right out of the oven, press the teaspoon gently again to make sure those indentations remain deep enough to hold your luscious filling
Step 12: Cool the Cookies
Allow the cookies to cool on the baking sheet for 5 minutes before transferring them to a wire rack for complete cooling This step prevents the cookies from breaking and helps the centers set perfectly
Step 13: Prepare Peanut Butter Filling
Stir together peanut butter and powdered sugar in a microwave-safe bowl Creating a smooth filling that is sweet, creamy, and just the right consistency to pour into your thumbprints
Step 14: Warm the Peanut Butter
Microwave the peanut butter mixture in 15-second bursts, stirring in between until pourable This makes filling your cookies a breeze and ensures every bite has a luxurious creamy center
Step 15: Fill the Cookies
Using a ½ teaspoon, fill each cookie indentation with the peanut butter mixture Feel free to alternate or mix up flavors here if you want to get creative with your fillings
Step 16: Melt the Chocolate
Place chocolate chips in a microwave-safe bowl and melt them in 5-second increments, stirring often until silky smooth This glossy drizzle adds the perfect finishing touch and a hint of rich chocolate
Step 17: Drizzle Chocolate over Cookies
Spoon the melted chocolate over the filled cookies, creating pretty swirls or zigzags Let your artistic side shine while adding that luscious chocolate layer everyone loves
Step 18: Let Set and Enjoy
Allow the cookies to sit at room temperature until the peanut butter and chocolate have firmed up This final step sets everything beautifully, making your Peanut Butter Chocolate Thumbprint Cookies Recipe ready to delight every taste bud
How to Serve Peanut Butter Chocolate Thumbprint Cookies Recipe
Garnishes
Sprinkle extra chopped peanuts or a light dusting of cocoa powder on top to boost the nutty charm and add a touch of elegance These simple garnishes make your cookies look bakery-worthy and taste even better
Side Dishes
Pair these cookies with a cold glass of milk, a cup of hot coffee, or even creamy vanilla ice cream for a dreamy dessert experience The rich chocolate and peanut butter flavors complement creamy and chilled favorites perfectly
Creative Ways to Present
Arrange the cookies in a beautiful cookie tin lined with parchment, or place them atop a dessert platter with fresh berries and mint leaves Whimsical ribbons around a jar of stacked cookies also make charming gifts that friends and family will adore
Make Ahead and Storage
Storing Leftovers
Keep any leftover cookies in an airtight container at room temperature for up to 4 days To keep that just-baked softness, place a slice of bread inside the container to help maintain moisture
Freezing
Freeze baked and cooled cookies in a single layer on a baking sheet, then transfer to a resealable freezer bag for up to 3 months Thaw completely before adding filling and chocolate drizzle for best texture and flavor
Reheating
Warm cookies gently in the microwave for 10 to 15 seconds to revive their soft texture Serve immediately so you can experience them warm and gooey, just like fresh from the oven
FAQs
Can I use crunchy peanut butter instead of smooth?
Absolutely The texture will add an extra layer of crunch inside your filling, making the cookies even more interesting and delicious Just be sure to microwave it until it’s smooth enough to pour into the indentations
What can I substitute for cocoa powder?
If you don’t have cocoa powder handy, you can try unsweetened baking chocolate melted and cooled or a chocolate-flavored hot cocoa mix However, cocoa powder gives the best rich chocolate taste and texture for this recipe
Is it okay to use salted peanuts instead of unsalted?
You can use salted peanuts if that’s what you have on hand Just reduce or omit the additional salt in the dry ingredients to keep the flavor balanced and avoid oversalting your cookies
Can these cookies be made gluten-free?
Yes! Swap the all-purpose flour for a gluten-free baking blend that measures cup for cup This allows everyone to enjoy the magic of this Peanut Butter Chocolate Thumbprint Cookies Recipe without compromising on taste or texture
How long do these cookies last?
Stored properly in an airtight container, these cookies stay fresh for up to 4 days at room temperature For longer storage, keep them frozen and thaw before serving to enjoy that fresh-baked flavor
Final Thoughts
I can’t recommend this Peanut Butter Chocolate Thumbprint Cookies Recipe enough if you want a dessert that’s both spectacularly delicious and incredibly comforting They’re perfect for sharing (if you can resist!), gifting, or treating yourself Any time you crave that perfect marriage of peanut butter and chocolate, these cookies will be your new go-to favorite. Give them a try and prepare for a flood of compliments!
Print
Peanut Butter Chocolate Thumbprint Cookies Recipe
- Prep Time: 25 minutes
- Cook Time: 40 minutes
- Total Time: 1 hour 5 minutes
- Yield: 30 cookies
- Category: Dessert
- Method: Baking
- Cuisine: American
Description
Delight in these rich and irresistible Peanut Butter Chocolate Thumbprint Cookies, featuring a tender cocoa-infused dough rolled in crunchy chopped peanuts and filled with luscious peanut butter, then drizzled with smooth melted chocolate for the perfect sweet and salty treat.
Ingredients
Dry Ingredients
- 1 cup All-purpose flour
- 1/2 cup Cocoa powder
- 1/4 teaspoon Salt
Wet Ingredients
- 1/2 cup Unsalted butter, softened
- 2/3 cup Sugar
- 1 Egg (separated, save the egg white)
- 2 Tablespoons Milk
- 1 teaspoon Vanilla extract
Coating & Filling
- 1 cup Peanuts, finely chopped
- 1 cup Peanut Butter
- 1/4 cup Powdered sugar
- 1/2 cup Chocolate Chips
Instructions
- Mix Dry Ingredients: In a small bowl, whisk together the all-purpose flour, cocoa powder, and salt until well combined to prepare the dry mix.
- Cream Butter and Sugar: In a large mixing bowl, beat the softened unsalted butter and sugar together until the mixture becomes light and fluffy, about 5 minutes, providing a creamy base for the dough.
- Add Wet Ingredients: Add the egg yolk, milk, and vanilla extract to the butter mixture. Continue mixing until the egg yolk is thoroughly incorporated, ensuring a smooth batter.
- Combine Dry and Wet Mixtures: Gradually add the dry ingredients to the wet mixture, half a cup at a time, and mix until the dough comes together, forming a cohesive, slightly firm dough.
- Chill Dough: Cover the bowl tightly with plastic wrap and refrigerate for 1 hour to firm up the dough, making it easier to handle for shaping.
- Preheat Oven: Set your oven to 350 degrees Fahrenheit (175 degrees Celsius) and allow it to fully preheat.
- Form Dough Balls: Remove chilled dough and roll into 1-inch balls, using roughly 1½ tablespoons of dough for each ball to ensure uniform cookie sizes.
- Coat with Egg White and Peanuts: Dip the bottom half of each dough ball into the reserved egg white, then roll it gently in the chopped peanuts, pressing the nuts into the dough to adhere nicely.
- Create Thumbprints: Use the back of a teaspoon to press a deep indentation into the center of each dough ball, preparing a space for the filling.
- Bake Cookies: Place cookies on a baking sheet and bake for 10 to 12 minutes until set but still soft.
- Deepen Indentations: Immediately after removing from the oven, press the back of the teaspoon again to deepen the indents if needed for better filling space.
- Cool Cookies: Allow cookies to cool for 5 minutes on the baking sheet, then transfer to wire racks to cool completely, preventing sogginess.
- Prepare Peanut Butter Filling: In a microwave-safe bowl, combine peanut butter and powdered sugar, mixing until smooth and consistent.
- Warm Peanut Butter: Heat the peanut butter mixture in the microwave in 15-second intervals, stirring between each, until pourable, typically around 30 seconds total.
- Fill Cookies: Using a ½ teaspoon, spoon the peanut butter filling into the thumbprint cavity of each cooled cookie, alternating flavors if desired.
- Melt Chocolate: Place chocolate chips in a microwave-safe bowl and heat in short 5-second bursts, stirring often until the chips are fully melted and smooth.
- Drizzle Chocolate: Spoon and drizzle the melted chocolate over the filled cookies for a beautiful finishing touch.
- Set Cookies: Let the cookies sit at room temperature until the peanut butter filling and chocolate drizzle have firmed up, ensuring clean, neat cookies ready to serve.
Notes
- Using the egg white to help peanuts stick creates a crunchy texture on the outside of the cookies.
- Chilling the dough is essential for maintaining the shape and ease of rolling.
- Alternate fillings by adding a splash of honey or a pinch of cinnamon to the peanut butter for variety.
- Store cookies in an airtight container at room temperature for up to 5 days.
- For thicker cookies, slightly increase the baking time but watch carefully to avoid overbaking.


