Description
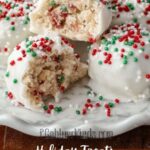
Delightfully festive and easy-to-make Little Debbie Christmas Cake Balls combine the classic flavor of Christmas Tree Cakes with creamy cream cheese and a smooth white chocolate coating. Perfect for holiday parties or a sweet seasonal treat, these bite-sized cake balls are decorated with red and green sprinkles to add a joyful touch. No baking required, just simple mixing, rolling, and chilling!
Ingredients
Scale
Cake Ball Mixture
- 1 box Little Debbie Christmas Tree Cakes (10 cakes)
- 1/2 cup cream cheese, softened
- 1/2 teaspoon vanilla extract
Coating & Decoration
- 1 cup white chocolate chips
- 1 tablespoon vegetable oil
- Red and green sprinkles (optional, for decorating)
Instructions
- Crumble the Cake: Begin by crumbling the Little Debbie Christmas Tree Cakes into a large bowl. Use your hands or a fork to break them into fine crumbs to create a uniform texture.
- Mix: Add the softened cream cheese and vanilla extract to the cake crumbs. Mix thoroughly until the mixture is smooth and holds together when pressed, indicating it’s ready to be shaped.
- Shape: Scoop tablespoon-sized portions of the cake mixture and roll them between your palms to form smooth, even balls. Place each shaped ball onto a baking sheet lined with parchment paper to prevent sticking and for easy cleanup.
- Melt Chocolate: In a microwave-safe bowl, combine the white chocolate chips and vegetable oil. Microwave in 20-30 second intervals, stirring well after each interval until the chocolate is completely melted and smooth.
- Coat: Using a fork, dip each cake ball into the melted white chocolate, rolling it to coat evenly. Allow any excess chocolate to drip off before returning the coated ball to the parchment-lined baking sheet.
- Decorate: While the coating is still wet, sprinkle red and green sprinkles over the cake balls to give them a festive holiday appearance.
- Chill: Place the coated and decorated cake balls in the refrigerator for at least 30 minutes to allow the chocolate coating to fully set and firm up.
- Serve: Once the coatings are set, serve the cake balls chilled or at room temperature and enjoy this delightful holiday treat.
Notes
- For easier rolling, keep your hands slightly damp or lightly dusted with powdered sugar.
- If white chocolate thickens before coating all cake balls, gently remelt to maintain a smooth consistency.
- Store leftover cake balls in an airtight container in the refrigerator for up to 5 days.
- For a different flavor twist, try dipping cake balls in milk or dark chocolate instead of white chocolate.
- These cake balls can be made a day ahead and stored chilled, making them convenient for holiday gatherings.