If you are craving a bold, savory snack that wraps up the best flavors of a cheeseburger with a garlicky twist, the Garlic Butter Bacon Cheeseburger Wraps Recipe is exactly what you need. This recipe delivers all the melty cheese, crispy bacon, and buttery garlic goodness nestled inside warm, golden tortillas. Perfect for game day, parties, or whenever you want a comforting yet fun appetizer, these wraps explode with flavor and are super easy to make. Get ready to treat yourself and your loved ones to a truly irresistible bite!
Ingredients You’ll Need
Gathering simple, quality ingredients is the secret to the mouthwatering magic of these wraps. Each component adds its own special touch, creating a perfect balance of creamy, smoky, and buttery notes with every bite.
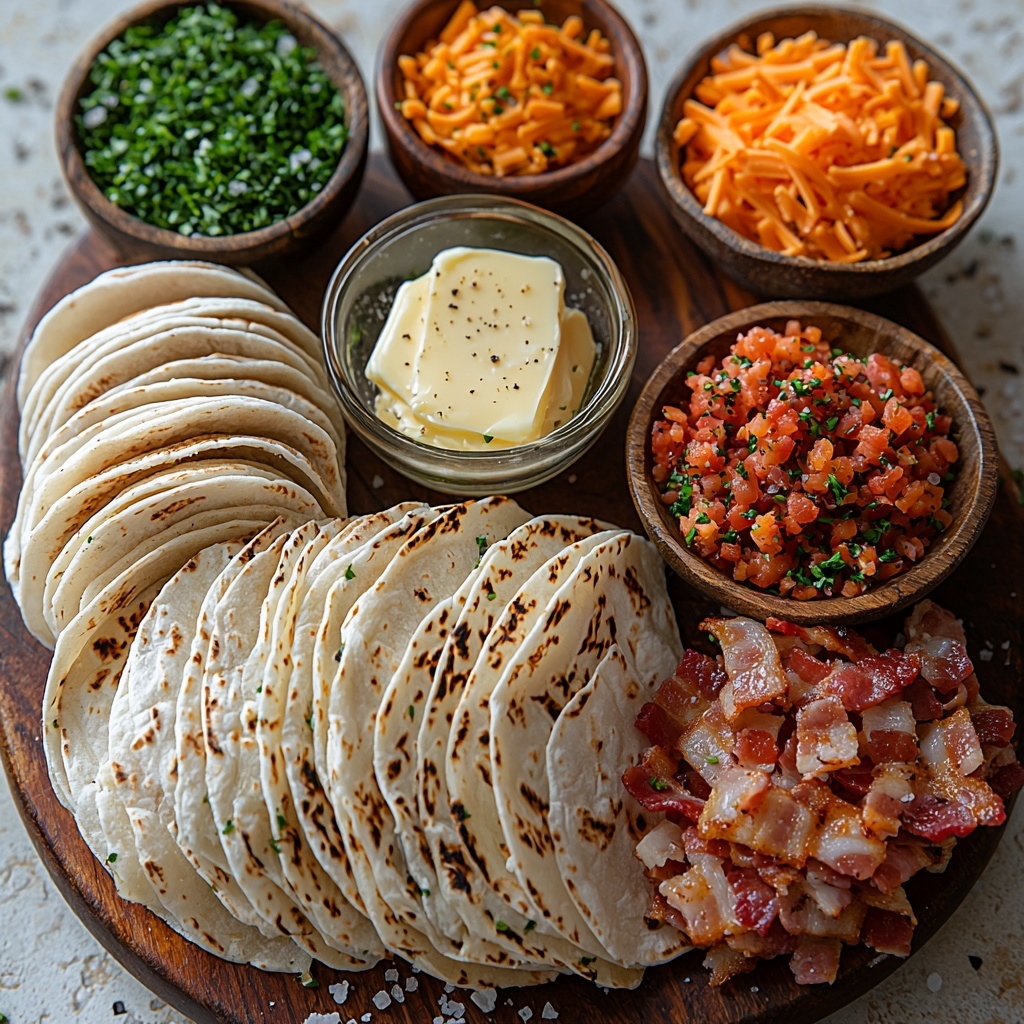
- Unsalted butter (1/4 cup, melted): Provides a rich, luscious base that carries the garlic and herbs beautifully.
- Garlic (2 cloves, minced): Infuses the butter with that unmistakable aroma and savory depth.
- Dried parsley (1 teaspoon): Adds a subtle herbal brightness and a pop of green color.
- Salt (1/2 teaspoon): Enhances all the flavors and balances the creamy cheese.
- Black pepper (1/4 teaspoon): Offers a gentle spicy kick to the buttery garlic mixture.
- Large flour tortillas (6): The soft, warm wrap that holds everything together while crisping up beautifully in the oven.
- Bacon (12 slices, cooked and crumbled): Brings irresistible smoky crunch that pairs perfectly with the cheese.
- Shredded cheddar cheese (1 cup): Sharp and melty, it’s the classic cheeseburger flavor you love.
- Shredded mozzarella cheese (1/2 cup): Adds stretchy, gooey texture and mild creaminess.
- Fresh chives (2 tablespoons, chopped, optional): Gives a fresh, oniony flair and a splash of color for presentation.
How to Make Garlic Butter Bacon Cheeseburger Wraps Recipe
Step 1: Prepare the Garlic Butter Mixture
Start by whisking together your melted unsalted butter, minced garlic, dried parsley, salt, and black pepper in a small bowl. This fragrant, seasoned butter is the flavor backbone for your wraps and sets the stage for that unforgettable garlic butter vibe.
Step 2: Preheat Your Oven
Set your oven to 190°C (375°F) so it’s ready to crisp those wraps to golden perfection. Getting your oven preheated early saves time later and ensures even cooking.
Step 3: Lay Out the Tortillas
Spread your large flour tortillas on a clean, flat surface. This makes it easy to evenly brush the garlic butter mixture and layer on the fillings without spills or mess.
Step 4: Brush the Tortillas with Garlic Butter
Generously brush each tortilla with the buttery garlic mix. Don’t hold back here — this step infuses every bite with rich, garlicky flavor and helps the wraps brown beautifully in the oven.
Step 5: Add Bacon and Cheeses
Sprinkle your cooked and crumbled bacon evenly across the tortillas, then layer on the shredded cheddar and mozzarella cheeses for that perfect cheeseburger melt. If you’re feeling fancy, add chopped fresh chives for color and a mild bite.
Step 6: Roll the Tortillas
Starting at one edge, roll each tortilla up tightly into a spiral. The tighter the roll, the easier it is to slice into neat, bite-sized pieces later.
Step 7: Arrange on Baking Sheet
Place each rolled tortilla seam-side down on a parchment-lined baking sheet. This keeps them from unraveling while baking and makes for easy cleanup.
Step 8: Brush Tops with Remaining Garlic Butter
Brush the tops of your rollups with any leftover garlic butter mixture. This extra layer will caramelize in the oven and bring a crispy, flavorful finish.
Step 9: Bake Until Golden and Melty
Bake your wraps for 12 to 15 minutes. They will turn a gorgeous golden brown as the tortillas crisp up and the cheese melts into bubbly, irresistible goodness.
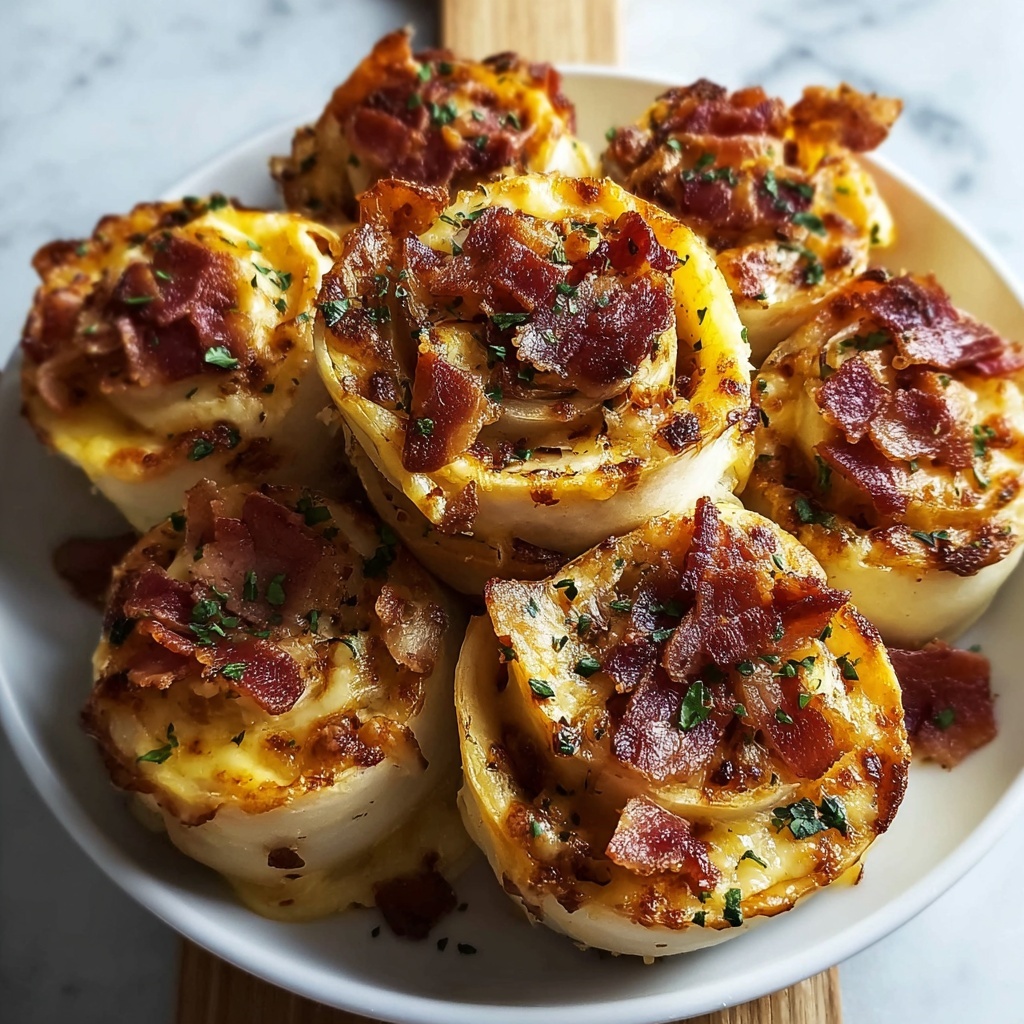
Step 10: Cool and Slice
Once out of the oven, let the wraps cool for a few minutes so the cheese can set just a bit. Then slice each roll into bite-sized pinwheels that are perfect for sharing or serving as a fun finger food.
Step 11: Serve and Enjoy!
Arrange your pinwheels on a platter and dig in while warm. These Garlic Butter Bacon Cheeseburger Wraps Recipe bites are guaranteed to become a crowd favorite!
How to Serve Garlic Butter Bacon Cheeseburger Wraps Recipe
Garnishes
For an extra touch, sprinkle fresh chopped chives or parsley atop your wraps just before serving. A light drizzle of a creamy ranch or a tangy chipotle mayo can add an exciting layer of flavor that complements the savory garlic and bacon perfectly.
Side Dishes
Pair these wraps with a fresh side salad or crisp veggie sticks to balance out their richness. Classic fries, sweet potato wedges, or even a tangy coleslaw work beautifully to round out a casual meal centered on this Garlic Butter Bacon Cheeseburger Wraps Recipe.
Creative Ways to Present
Try serving the pinwheel wraps on a wooden board with small bowls of dipping sauces for a fun appetizer spread. You could also spear individual pieces with colorful cocktail picks for easy party finger food. For something different, wrap the pinwheels in lettuce leaves for a lower-carb twist.
Make Ahead and Storage
Storing Leftovers
After enjoying your Garlic Butter Bacon Cheeseburger Wraps Recipe, store any leftovers in an airtight container in the refrigerator for up to 3 days. They’ll keep their flavor well and can be quickly reheated when hunger strikes again.
Freezing
If you want to prepare these wraps ahead of time, you can freeze the unbaked rolled tortillas on a tray until firm, then transfer to a freezer bag. Bake directly from frozen, cooking a few minutes longer. This is a fantastic way to have delicious snacks ready whenever you want.
Reheating
Reheat leftovers in the oven at 175°C (350°F) for about 8-10 minutes to bring back the crispiness and melty cheese texture. Avoid microwaving if possible, as it can make the wraps soggy.
FAQs
Can I use other types of cheese in this recipe?
Absolutely! Feel free to experiment with cheeses like pepper jack for a spicy kick or Swiss for a mellow nutty flavor. Just make sure to pick cheeses that melt well for that gooey goodness we love.
Is it possible to make this recipe vegetarian?
Yes! Simply omit the bacon and add sautéed mushrooms or crispy tempeh for a similar smoky, savory texture. The garlic butter and cheeses still ensure plenty of flavor.
What’s the best way to cook the bacon for these wraps?
Cooking bacon until it’s crispy but not overly hard works best here. Oven-baked or pan-fried bacon both work well—just crumble it once cool before adding to the tortillas.
Can I use whole wheat or corn tortillas instead of flour tortillas?
Flour tortillas have the perfect pliability for rolling and crisping, but you can try whole wheat tortillas if you prefer a heartier, nutty flavor. Corn tortillas are less flexible and might crack when rolled, so they’re less ideal for this recipe.
How do I make these wraps spicier?
Add some red pepper flakes to the garlic butter mixture or sprinkle a little cayenne powder onto the cheese before rolling. You can also serve with a spicy dipping sauce like sriracha mayo for extra heat.
Final Thoughts
This Garlic Butter Bacon Cheeseburger Wraps Recipe is a deliciously indulgent treat that’s surprisingly easy to make and always a hit wherever it lands. Whether you’re feeding a crowd or simply craving a flavorful snack, these wraps bring comfort food to a whole new, exciting level. Give them a try and watch how quickly they disappear from the plate!
Print
Garlic Butter Bacon Cheeseburger Wraps Recipe
- Prep Time: 15 minutes
- Cook Time: 15 minutes
- Total Time: 30 minutes
- Yield: 6 servings
- Category: Appetizer
- Method: Baking
- Cuisine: American
Description
These Garlic Butter Bacon Cheeseburger Rollups combine the rich flavors of garlic butter, crispy bacon, and melted cheddar and mozzarella cheeses all wrapped in warm, toasted tortillas. Perfect as a crowd-pleasing appetizer or snack, they are baked to golden perfection with a crispy outside and gooey cheesy center.
Ingredients
Garlic Butter Mixture
- 1/4 cup unsalted butter, melted
- 2 cloves garlic, minced
- 1 teaspoon dried parsley
- 1/2 teaspoon salt
- 1/4 teaspoon black pepper
Rollups
- 6 large flour tortillas
- 12 slices bacon, cooked and crumbled
- 1 cup shredded cheddar cheese
- 1/2 cup shredded mozzarella cheese
- 2 tablespoons chopped fresh chives (optional)
Instructions
- Prepare Garlic Butter: In a small bowl, combine the melted butter, minced garlic, dried parsley, salt, and black pepper. Mix well and set aside.
- Preheat Oven: Preheat your oven to 190°C (375°F) to ensure it’s ready for baking the rollups evenly.
- Arrange Tortillas: Lay out the flour tortillas flat on a clean surface to prepare for assembly.
- Brush with Garlic Butter: Generously brush each tortilla with the prepared garlic butter mixture, covering the whole surface.
- Add Toppings: Evenly sprinkle the cooked and crumbled bacon slices over each garlic buttered tortilla, followed by the shredded cheddar and mozzarella cheeses. Optionally, sprinkle chopped fresh chives on top.
- Roll Tortillas: Starting from one edge, roll each tortilla up tightly into a spiral to keep the filling intact.
- Place on Baking Sheet: Arrange the rolled tortillas seam-side down on a baking sheet lined with parchment paper for easy cleanup.
- Brush Tops: Brush the tops of the rolled tortillas with any remaining garlic butter to enhance flavor and promote browning.
- Bake: Bake in the preheated oven for 12-15 minutes until the tortillas turn golden brown and crispy, and the cheese inside is melted and bubbly.
- Cool Slightly: Remove the rollups from the oven and let them cool for a few minutes to avoid burning when serving.
- Slice and Serve: Slice each rollup into bite-sized pieces and arrange them on a serving platter. Serve immediately and enjoy the cheesy, garlicky goodness.
Notes
- You can substitute flour tortillas with whole wheat tortillas for a slightly healthier option.
- Adjust the amount of garlic and parsley in the butter to suit your preference.
- For extra cheesiness, sprinkle some Parmesan on top before baking.
- If desired, serve with a side of ranch dressing or your favorite dipping sauce.
- To keep the bacon crispy, cook it until very crisp before crumbling.

