
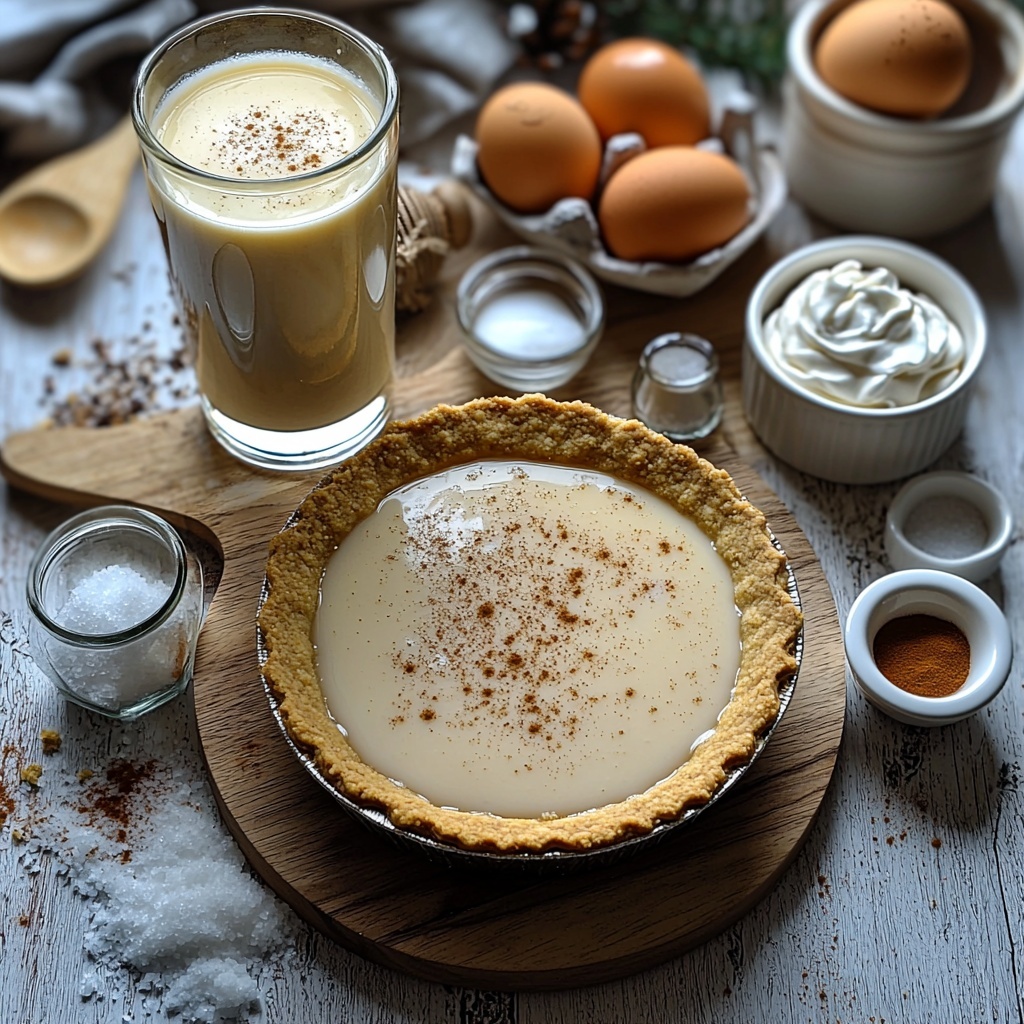
If you’re dreaming of a dessert that perfectly captures the warmth and comfort of the holiday season, you’re going to adore this Eggnog Pie with Cozy Spices and Creamy Custard Recipe. It’s a dreamy fusion of silky custard, rich eggnog, and just the right blend of warming spices like nutmeg and cinnamon, all nestled inside a buttery graham cracker crust. This pie isn’t just a treat to eat, it’s a festive experience that makes every bite feel like a cozy holiday hug, perfect for sharing with friends and family or savoring quietly by yourself with a cup of cocoa.
Ingredients You’ll Need
To make this Eggnog Pie with Cozy Spices and Creamy Custard Recipe stand out, all you need are simple, pantry-friendly ingredients that come together like magic. Each element plays a crucial role in building layers of flavor and that irresistibly smooth texture.
- 1 9-inch graham cracker crust: The buttery, toasty base that provides the perfect contrast to the creamy filling and keeps the process easy.
- 2 cups eggnog: Your star ingredient, so pick a brand you love — it drives the flavor of this pie.
- 1 cup heavy cream: Adds luscious richness and helps the custard achieve that silky mouthfeel.
- 1/2 cup granulated sugar: Balances the spices with just the right sweetness; adjust depending on your eggnog’s natural sugar.
- 3 large egg yolks: Essential for creating a creamy, custard-like filling that slices beautifully.
- 3 tablespoons cornstarch: The secret to a perfectly set pie without a starchy flavor.
- 1 teaspoon vanilla extract: Rounds out the earthy flavors with a gentle warmth.
- 1 teaspoon ground nutmeg: The classic holiday spice that instantly transports you to festive moments.
- 1/2 teaspoon ground cinnamon: Adds cozy complexity to the spice mix.
- 1/4 teaspoon fine salt: Sharpens the sweetness and enhances every note of flavor.
- Whipped cream: For topping — whether homemade or store-bought, it finishes the pie with a light, airy flourish.
- Freshly grated nutmeg or a pinch of cinnamon: The perfect garnish to signal this is a holiday dessert celebration.
How to Make Eggnog Pie with Cozy Spices and Creamy Custard Recipe
Step 1: Prep Your Setup
Start by placing your graham cracker crust on a rimmed baking sheet to make handling easier later. If you want the smoothest possible filling, set a fine-mesh strainer over a clean bowl or measuring cup. Have a whisk and a silicone spatula ready because you’ll need them both in a moment.
Step 2: Mix the Thickening Base
Whisk together the sugar and cornstarch in a medium bowl until evenly combined. Then add the egg yolks and whisk until the mixture lightens slightly and looks silky. Next, pour in about half a cup of eggnog to loosen the yolks—this step is crucial to prevent lumps and helps everything blend smoothly when added to the pot.
Step 3: Warm the Dairy and Spices
Combine the remaining eggnog and heavy cream in a medium saucepan along with the nutmeg, cinnamon, and salt. Heat over medium, stirring occasionally, until the mixture is hot and steamy but avoid boiling. The gentle heat infuses the spices perfectly and prepares the mixture for the custard base.
Step 4: Temper the Yolks
To avoid scrambled eggs, slowly pour about one cup of the hot milk mixture into the yolks in a thin stream while whisking vigorously. This gradual warming is the trick to creating a luscious, silky custard.
Step 5: Cook Until Thick and Glossy
Pour the tempered yolk mixture back into the saucepan and cook on medium to medium-low heat, whisking constantly. After 3 to 6 minutes, you’ll see the filling thicken to a pudding-like consistency with a glossy sheen. Keep whisking for another 30 to 60 seconds to fully activate the cornstarch and guarantee the pie will set beautifully.
Step 6: Finish the Flavor
Remove the pan from the heat and stir in the vanilla extract. This adds a fragrant warmth that makes the filling feel complete and irresistibly inviting.
Step 7: Strain and Fill the Crust
For the smoothest custard possible, strain the filling through a fine mesh into your bowl or measuring cup. Pour the filling gently into the prepared crust and tap the pan a couple of times to pop any air bubbles trapped inside.
Step 8: Chill Until Set
Let the pie cool for 20 to 30 minutes at room temperature, cover it loosely to avoid the wrap touching the surface, and refrigerate for at least 6 hours or overnight for perfect slicing. The long chill time is well worth it for that beautifully firm, yet creamy texture.
Step 9: Top and Serve
Right before serving, crown your pie with a cloud of whipped cream and a dusting of freshly grated nutmeg or cinnamon. Slice with a sharp knife wiped between cuts for flawless, bakery-style slices that will impress every guest at the table.
How to Serve Eggnog Pie with Cozy Spices and Creamy Custard Recipe
Garnishes
The finishing touches are what make this Eggnog Pie with Cozy Spices and Creamy Custard Recipe truly festive. Freshly whipped cream dusted with nutmeg or cinnamon never fails to elevate the look and flavor, adding a soft texture and extra layer of warmth. Consider adding a few toasted pecans for crunch or a drizzle of caramel for a decadent twist.
Side Dishes
This pie pairs beautifully with light, complementary flavors. Think fresh berries or a simple fruit compote to balance the rich custard. A hot cup of coffee or spiced tea alongside makes for an effortless holiday pairing that completes the indulgent vibe perfectly.
Creative Ways to Present
Serve your pie in individual glass ramekins topped with whipped cream and a sprinkle of nutmeg for an elegant presentation. Or, layer slices with dollops of eggnog-spiced whipped cream between to create bite-sized dessert parfaits. Get playful with garnishes—try cinnamon sticks nestled in the whipped cream or even a sprinkle of crushed gingersnap cookies for extra holiday cheer.
Make Ahead and Storage
Storing Leftovers
Leftover Eggnog Pie with Cozy Spices and Creamy Custard Recipe keeps beautifully in the refrigerator. Cover it tightly with plastic wrap or store in an airtight container to maintain its creamy texture and prevent it from absorbing fridge odors. It’s best enjoyed within 3 to 4 days for peak freshness.
Freezing
While freezing custard pies can be tricky due to texture changes, you can freeze this eggnog pie if needed. Wrap it tightly with plastic wrap and foil. When thawing, do so slowly in the fridge overnight to help it regain some firmness, though the custard might become slightly softer than freshly made.
Reheating
This dessert is lovely chilled, so reheating is generally not recommended. If you’d like to serve it less cold, let slices sit at room temperature for about 15 minutes before serving; this softens the filling and makes each bite melt in your mouth even more.
FAQs
Can I make this pie dairy-free?
Absolutely! Use dairy-free eggnog and a non-dairy heavy cream substitute like coconut cream. Keep in mind texture and flavor might shift slightly, but the cozy spice combo will still shine.
What if I don’t have a graham cracker crust?
Feel free to use a gingersnap crust for a spicier touch or a traditional pie crust baked ahead of time. Both options bring their own charm to the Eggnog Pie with Cozy Spices and Creamy Custard Recipe.
How can I tell when the custard is done cooking?
The filling should thicken enough to coat the back of a spoon with a glossy finish. It usually takes 3 to 6 minutes of steady whisking on medium heat—don’t rush this step to avoid a grainy texture.
Is it necessary to strain the custard?
While optional, straining is highly recommended for the smoothest, silkiest filling. It catches any little cooked egg bits or clumps that might have formed, leaving you with perfect custard every time.
Can I prepare this pie a day in advance?
Yes! In fact, chilling the pie overnight enhances the flavors and allows the filling to set perfectly. This makes it a fantastic make-ahead dessert for holiday entertaining.
Final Thoughts
There’s something truly magical about this Eggnog Pie with Cozy Spices and Creamy Custard Recipe. It effortlessly brings together flavors and textures that feel like holiday warmth on a plate. Whether you’re making it for a festive gathering or a quiet treat, I promise this pie will become a beloved part of your seasonal dessert rotation. So grab your ingredients and dive into this creamy, spiced indulgence—you deserve a slice of holiday happiness!
Print
Eggnog Pie with Cozy Spices and Creamy Custard Recipe
- Prep Time: 25 minutes
- Cook Time: 6 minutes
- Total Time: 6 hours 31 minutes
- Yield: 10 servings
- Category: Dessert
- Method: Stovetop
- Cuisine: American
Description
This Eggnog Pie is a magical and perfectly spiced holiday delight featuring a creamy, custard-like filling infused with classic eggnog flavors and warm spices. Set in a buttery graham cracker crust and finished with whipped cream and a sprinkle of nutmeg or cinnamon, it’s an easy-to-make, festive dessert that delivers silky smooth texture and cozy holiday vibes.
Ingredients
Crust
- 1 9-inch graham cracker crust (store-bought or homemade)
Filling
- 2 cups eggnog (store-bought)
- 1 cup heavy cream
- 1/2 cup granulated sugar
- 3 large egg yolks
- 3 tablespoons cornstarch
- 1 teaspoon vanilla extract
- 1 teaspoon ground nutmeg
- 1/2 teaspoon ground cinnamon
- 1/4 teaspoon fine salt
Topping
- Whipped cream (homemade or store-bought)
- Freshly grated nutmeg or a pinch of cinnamon (for garnish)
Instructions
- Prepare your setup: Place the graham cracker crust on a rimmed baking sheet to make moving easier later. Set a fine-mesh strainer over a bowl or large measuring cup for a smooth filling. Keep a whisk and silicone spatula nearby.
- Mix the thickening base: In a medium bowl, whisk together the sugar and cornstarch until combined. Add egg yolks and whisk until smooth and slightly lighter in color. Whisk in about 1/2 cup of the eggnog to loosen the mixture, reducing lumps.
- Warm the dairy and spices: In a medium saucepan over medium heat, combine remaining eggnog, heavy cream, nutmeg, cinnamon, and salt. Warm, whisking occasionally, until the mixture is steamy and hot but not boiling to avoid curdling the custard.
- Temper the yolks: With one hand whisking the yolk mixture, slowly ladle about 1 cup of the hot eggnog mixture into yolks, whisking constantly to gently warm them and prevent scrambling.
- Cook until thick and glossy: Pour the tempered yolk mixture back into the saucepan. Cook over medium to medium-low heat, whisking constantly, until thick and pudding-like, about 3-6 minutes. Continue cooking for 30-60 seconds to fully activate cornstarch.
- Finish the flavor: Remove the pan from heat and stir in vanilla extract until fragrant.
- Strain and fill the crust: Pour the filling through the strainer into a bowl or measuring cup for ultra-smooth texture. Pour warm filling into the prepared crust and gently tap on the counter to release air bubbles.
- Chill until set: Let pie cool at room temperature for 20-30 minutes. Cover loosely and refrigerate for at least 6 hours, ideally overnight, for clean slices and full setting.
- Top and serve: Before serving, top with whipped cream and a light dusting of freshly grated nutmeg or cinnamon. Slice with a sharp knife wiped clean between cuts for bakery-style wedges.
Notes
- Using cold eggnog and cream makes it easier to control thickening and prevents overcooking.
- Freshly grated nutmeg enhances flavor, but pre-ground nutmeg works fine.
- Optionally, use a gingersnap crust instead of graham cracker for extra holiday spice.
- Whisk constantly to avoid lumps and ensure silky smooth custard.
- Do not boil the eggnog mixture to prevent grainy texture.
- Allow pie to chill thoroughly for best clean slicing and firm texture.


