“`html
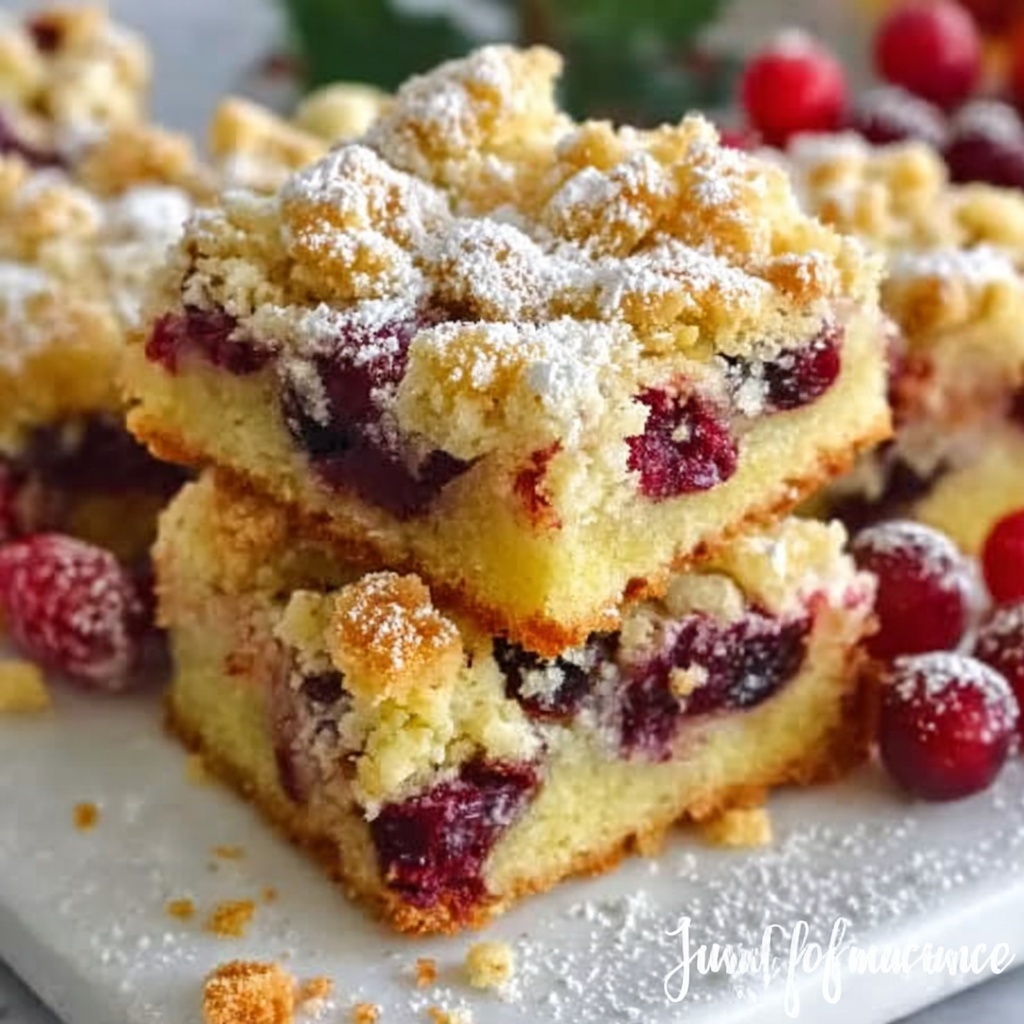
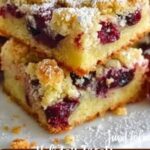
If you’re searching for a festive treat that perfectly captures the joy of the season, look no further than this Christmas Cherry Bars Recipe. These bars burst with vibrant cherry filling nestled between layers of buttery, tender dough, all topped with a delicate glaze that adds just the right touch of sweetness. Whether you’re baking for holiday gatherings or simply craving a slice of cozy comfort, these bars are guaranteed to become a beloved tradition.
Ingredients You’ll Need
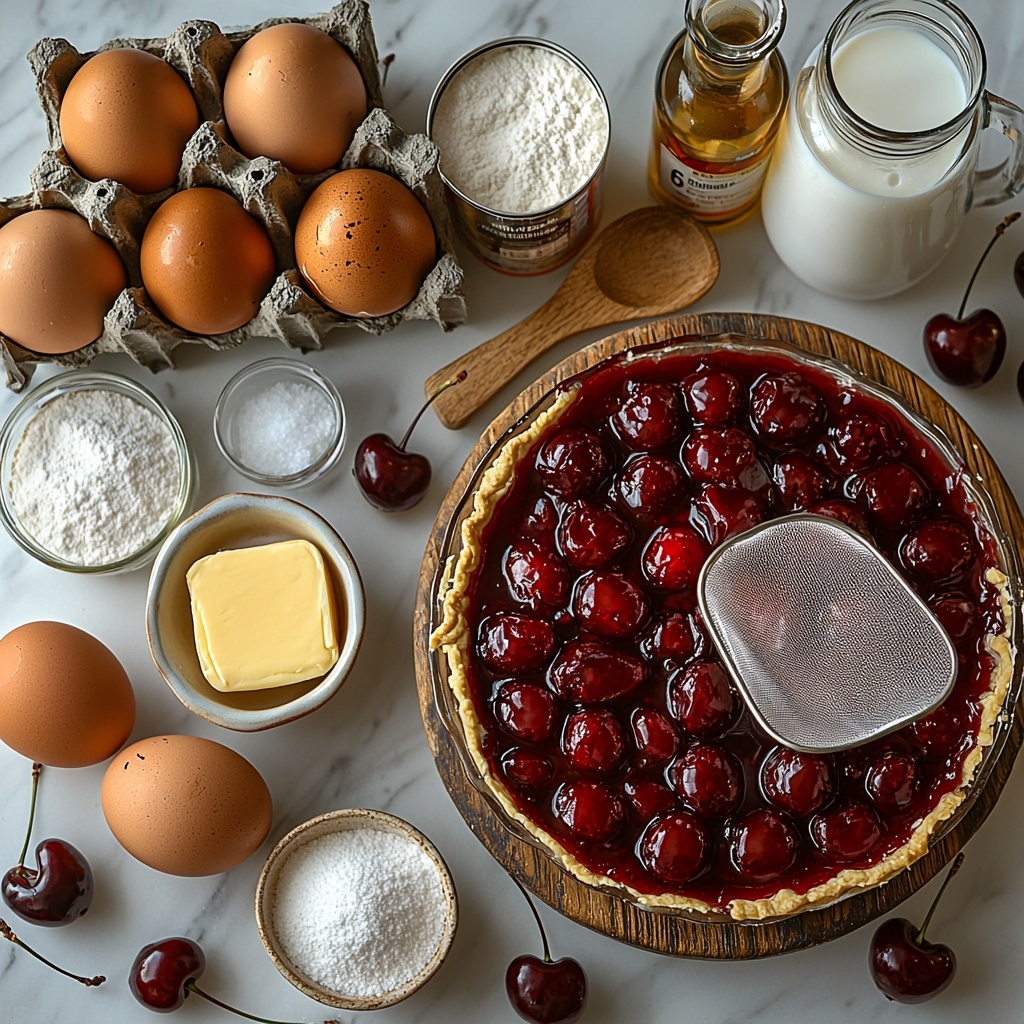
This Christmas Cherry Bars Recipe calls for straightforward, pantry-friendly ingredients that come together to create a magical balance of flavors and textures. Each component plays a vital role—rich butter brings moistness, cherries add a festive pop of color and sweetness, and the glaze rounds everything off with a luscious finish.
- 1 cup butter, softened: Provides a rich, tender crumb and buttery flavor that’s essential for the dough’s texture.
- 2 cups sugar: Sweetens the dough perfectly without overpowering the natural cherry flavor.
- 1 teaspoon salt: Enhances all the other flavors and balances the sweetness.
- 4 large eggs, room temperature: Helps bind the dough while adding moisture and richness.
- 1 teaspoon vanilla extract: Adds warmth and depth to the dough’s flavor.
- 1/4 teaspoon almond extract: Gives a subtle, nutty hint that complements cherries beautifully.
- 3 cups all-purpose flour: Creates the sturdy base and crumb for the bars.
- 2 cans (21 oz each) cherry pie filling: The star ingredient providing sweet, luscious cherries with syrupy goodness.
- 1 cup confectioners’ sugar: Used to make the glaze; its fine texture is perfect for smooth drizzling.
- 1/2 teaspoon vanilla extract: In the glaze for added flavor harmony.
- 1/2 teaspoon almond extract: In the glaze, echoing the dough’s flavors for a unified taste.
- 2–3 tablespoons whole milk: Adjusts the glaze consistency for easy drizzling.
How to Make Christmas Cherry Bars Recipe
Step 1: Prepare Your Oven and Pan
Start by preheating your oven to 350°F (175°C). Get a 15×10-inch sheet pan ready by spraying it lightly with baking spray to prevent sticking. Having the oven and pan prepared upfront makes assembly smooth and ensures the bars bake evenly.
Step 2: Cream the Butter, Sugar, and Salt
In a large bowl, cream together the softened butter, sugar, and salt until you achieve a light and fluffy mixture. This step is crucial as it incorporates air, leading to a tender and soft dough that’s utterly melt-in-your-mouth.
Step 3: Incorporate Eggs and Extracts
Add the eggs one at a time, beating well after each addition to create a smooth batter. Then stir in the vanilla and almond extracts. These aromatic flavors elevate the simple dough, giving it a warm, festive scent and taste.
Step 4: Mix in the Flour
Gradually add the all-purpose flour, mixing just until a dough forms. Be careful not to overmix here, as that can make the bars tough. Your dough should be firm enough to press but still tender.
Step 5: Form the Base Layer
Press 3 cups of the dough evenly into the bottom of your prepared sheet pan. This creates a sturdy base that will hold the luscious cherry filling without getting soggy—a flaky canvas for that festive red treasure.
Step 6: Add the Cherry Pie Filling
Spread the cherry pie filling evenly over the dough layer. The vibrant cherries and their syrupy sauce create a sweet and slightly tart layer that’s jam-packed with holiday cheer.
Step 7: Top with Remaining Dough
Drop spoonfuls of the remaining dough over the cherry filling to form a rustic, crumbly topping. This step adds texture, giving the bars a delightful contrast between soft fruit and buttery crust.
Step 8: Bake Until Golden
Pop the pan in the oven and bake for 35-40 minutes until the top turns golden brown and inviting. The aroma filling your kitchen will be one of those joyful holiday moments you won’t forget.
Step 9: Cool and Prepare the Glaze
Let the bars cool completely in the pan—this helps the cherry filling set so the bars hold together beautifully once cut. Meanwhile, whisk together confectioners’ sugar, vanilla extract, almond extract, and milk until smooth, making a luscious glaze.
Step 10: Drizzle and Serve
Drizzle the glaze generously over the cooled bars. Allow the glaze to set before slicing the bars into squares and serving. That final glaze adds a perfect hint of sweetness and an elegant finish to these delightful treats.
How to Serve Christmas Cherry Bars Recipe
Garnishes
For an extra festive touch, dust the bars lightly with a little extra confectioners’ sugar or sprinkle with chopped toasted almonds for crunch. Fresh mint leaves also add a lovely color contrast and refreshing aroma that complements the cherry flavors perfectly.
Side Dishes
These cherry bars pair wonderfully with a scoop of vanilla ice cream or a dollop of whipped cream to balance their sweet-tart profile. For holiday breakfasts, serve alongside a cup of rich coffee or spiced tea to round out the experience.
Creative Ways to Present
Cut the bars into small bite-sized pieces for a festive dessert platter or holiday cookie exchange. Alternatively, layer them in clear jars alternating with whipped cream for a beautiful layered dessert that’s as charming as it is delicious. Wrapping individual squares in parchment can make a thoughtful, homemade gift.
Make Ahead and Storage
Storing Leftovers
You can store leftover Christmas Cherry Bars in an airtight container at room temperature for 3-4 days. This keeps them fresh and moist, ready to be enjoyed with minimal effort. If your kitchen is warm, refrigeration can help but may slightly firm up the glaze.
Freezing
These bars freeze beautifully either whole or cut into squares. Wrap them tightly in plastic wrap and place in a freezer-safe container. They’ll keep well for up to 2 months. Thaw at room temperature before serving, and add a quick glaze drizzle if desired to refresh their appearance.
Reheating
To enjoy warm bars, reheat individual squares in the microwave for 10-15 seconds or warm the entire pan in a low oven (about 300°F) for 10 minutes. This brings back that freshly-baked feeling and intensifies the aroma of the almond and cherry filling.
FAQs
Can I use fresh cherries instead of canned pie filling?
While fresh cherries are delightful, canned cherry pie filling is recommended here for its syrupy consistency and balanced sweetness which is key to achieving the perfect texture and flavor in this recipe.
Is there a way to make this recipe gluten-free?
You can substitute the all-purpose flour with a gluten-free baking blend, but be sure it contains xanthan gum for structure. The texture may vary slightly, but the bars will still be delicious.
Can I make the dough ahead of time?
Yes! The dough can be prepared and refrigerated for up to 24 hours before assembling the bars. Let it come to room temperature before pressing into the pan to make spreading easier.
What if I don’t have almond extract?
Almond extract adds a unique flavor that pairs beautifully with cherries, but if you don’t have it, you can omit it or replace it with an equal amount of vanilla extract for a milder, sweet aroma.
How thick should the dough layer be?
Press about 3 cups of dough evenly across the bottom of the pan. This results in a sturdy base that’s not too thick or thin, perfectly supporting the cherry filling without overwhelming it.
Final Thoughts
This Christmas Cherry Bars Recipe is a wonderful way to bring festive cheer into your kitchen with minimal fuss and maximum flavor. The combination of buttery dough, bright cherry filling, and a sweet glaze makes every bite feel like a holiday celebration. I can’t wait for you to bake these and share the joy with family and friends—it truly is a seasonal favorite that never disappoints!
“`
Print
Christmas Cherry Bars Recipe
- Prep Time: 15 minutes
- Cook Time: 40 minutes
- Total Time: 1 hour 5 minutes
- Yield: 24 servings
- Category: Dessert
- Method: Baking
- Cuisine: American
Description
Delight in these festive Christmas Cherry Bars featuring a buttery, tender crust layered with sweet cherry pie filling and finished with a smooth almond-glazed drizzle. Perfect for holiday gatherings or anytime you crave a nostalgic sweet treat.
Ingredients
Dough
- 1 cup butter, softened
- 2 cups sugar
- 1 teaspoon salt
- 4 large eggs, room temperature
- 1 teaspoon vanilla extract
- 1/4 teaspoon almond extract
- 3 cups all-purpose flour
Filling
- 2 cans (21 oz each) cherry pie filling
Glaze
- 1 cup confectioners’ sugar
- 1/2 teaspoon vanilla extract
- 1/2 teaspoon almond extract
- 2–3 tablespoons whole milk
Instructions
- Preheat Oven and Prepare Pan: Preheat your oven to 350°F (175°C). Spray a 15×10-inch sheet pan with baking spray to ensure the bars don’t stick and bake evenly.
- Cream Butter, Sugar, and Salt: In a large bowl, combine the softened butter, sugar, and salt. Beat together until the mixture is light and fluffy, creating a creamy base for the dough.
- Add Eggs and Extracts: Incorporate the eggs one at a time, beating well after each addition to ensure even mixing. Stir in the vanilla and almond extracts for added flavor.
- Mix in Flour to Form Dough: Gradually add the all-purpose flour to the butter mixture, mixing until a cohesive dough forms without overworking.
- Press Dough into Pan: Take 3 cups of the dough and press it evenly into the bottom of the prepared sheet pan, forming the crust layer.
- Spread Cherry Filling: Evenly spread both cans of cherry pie filling over the dough layer, covering the surface completely with the sweet cherries.
- Add Remaining Dough on Top: Drop spoonfuls of the remaining dough over the cherry filling, distributing them as evenly as possible to create a crumbly topping.
- Bake the Bars: Place the pan in the oven and bake for 35-40 minutes, or until the top dough turns golden brown. Remove from oven and allow the bars to cool completely in the pan to set properly.
- Prepare the Glaze: In a small bowl, whisk together the confectioners’ sugar, vanilla extract, almond extract, and milk until smooth and pourable.
- Glaze and Serve: Drizzle the glaze evenly over the cooled bars. Allow the glaze to set before cutting into squares and serving your delicious Christmas Cherry Bars.
Notes
- Ensure eggs are at room temperature for better incorporation and dough consistency.
- Don’t overmix the flour to keep the dough tender.
- Allow bars to cool completely before glazing to prevent the glaze from melting.
- For a thicker glaze, use less milk; for a thinner glaze, add more milk gradually.
- Store leftover bars in an airtight container at room temperature for up to 3 days or refrigerate for up to a week.
