
If you’re looking for a fun, festive twist on traditional holiday treats, the Brownie Christmas Trees Recipe is exactly what you need to bring a sparkle to your dessert table. Combining the rich, fudgy goodness of homemade brownies with vibrant green frosting and whimsical candy cane trunks, these edible Christmas trees are as delightful to look at as they are to eat. Whether you’re serving them at a family gathering or gifting them to friends, these charming brownie trees capture the spirit of the season in every bite.
Ingredients You’ll Need
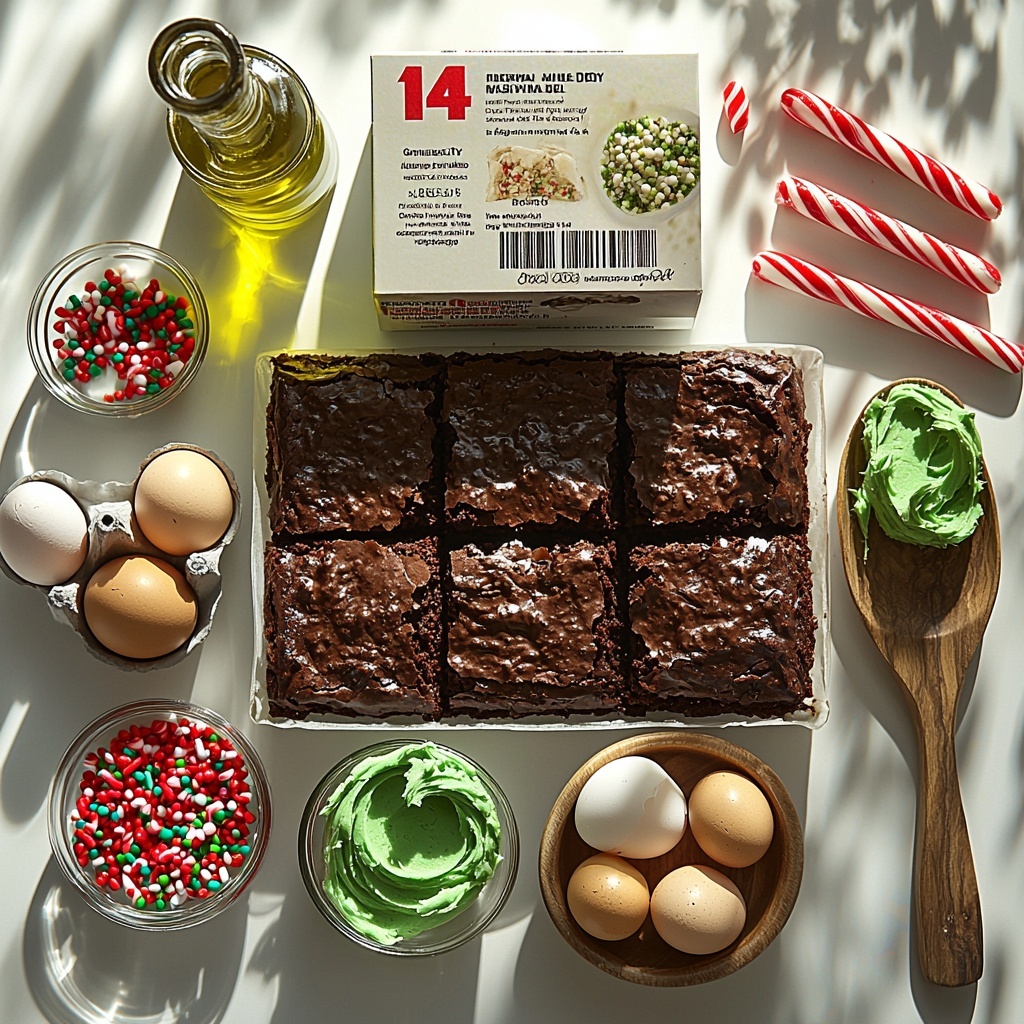
This Brownie Christmas Trees Recipe relies on simple yet essential ingredients that come together to create the perfect balance of fudgy texture, sweet frosting, and festive color. Each component plays a unique role in making your treats irresistible and visually stunning.
- 1 (18oz.) box brownie mix: This forms the base of your brownies, providing that classic rich and chocolaty flavor with ease.
- Oil, eggs, and water: Ingredients specified on the brownie mix box to ensure the perfect batter consistency and moistness.
- 1 additional egg yolk: Added for extra richness and to enhance the brownies’ fudgy texture.
- 1 (16oz.) tub vanilla frosting: A smooth, sweet canvas perfect for coloring and decorating your Christmas trees.
- Green food coloring: Gives the frosting that festive pine tree hue, instantly turning your brownies into holiday magic.
- Sprinkles: Adds fun, colorful accents mimicking ornaments and twinkling lights on your edible trees.
- Candy canes: These serve as the whimsical trunks of your brownie trees, adding a peppermint twist and a playful touch.
How to Make Brownie Christmas Trees Recipe
Step 1: Preheat and Prepare
Start by preheating your oven to the temperature recommended on the brownie mix box. Line a 9×9-inch baking pan with parchment paper, leaving enough overhang on the sides so you can easily lift out the brownies once baked. This simple step makes clean-up a breeze and helps keep your brownie edges intact.
Step 2: Mix the Brownie Batter
In a large bowl, whisk together the ingredients listed on your brownie mix box along with one extra egg yolk. The additional yolk enhances the richness, making your brownies delightfully fudgy. Be sure not to over-mix—combine just until the flour disappears to keep the texture soft and tender.
Step 3: Bake Your Brownies
Pour the batter into the prepared pan and bake according to the time on the box. To ensure the brownies stay moist and chewy, start checking a few minutes before the minimum bake time. Perfectly baked brownies will pull away slightly from the edges but remain soft in the center.
Step 4: Cool and Prepare Frosting
Let the brownies cool completely in the pan on a wire rack. While you wait, mix your vanilla frosting with green food coloring until you achieve a festive, tree-like shade of green. This frosting will be the leafy “branches” of your dessert Christmas trees.
Step 5: Remove and Trim Brownies
Once cooled, carefully lift the brownies out using the parchment overhang. Trim off the outer edges for neat, even pieces that are easier to cut into tree shapes.
Step 6: Cut Into Tree Shapes
Patience is key here—make sure your brownies are completely cool before cutting to avoid crumbling. For 18 smaller trees, slice the brownies into three long strips, then cut each strip into six triangles by making diagonal cuts. For larger trees, cut the brownies in half lengthwise, then slice each half into four triangle shapes, trimming the ends slightly for a clean zig-zag pattern.
Step 7: Decorate Your Brownie Christmas Trees Recipe
Use your green-tinted frosting to generously decorate each brownie triangle, forming the lush branches of the Christmas tree. Sprinkle with colorful sprinkles to mimic twinkling ornaments, and finish by sticking short pieces of candy canes at the bottom of each triangle to serve as charming tree trunks.
How to Serve Brownie Christmas Trees Recipe
Garnishes
For an extra festive touch, consider adding edible glitter or tiny sugar pearls to your Christmas tree brownies. These add sparkle and elevate the presentation, making each brownie look like a little holiday masterpiece straight from a winter wonderland.
Side Dishes
These brownie Christmas trees pair beautifully with a cup of hot cocoa or creamy eggnog, balancing out their rich chocolate flavor. You can also serve alongside fresh berries or a dollop of whipped cream to add freshness and contrast.
Creative Ways to Present
Arrange your Brownie Christmas Trees Recipe on a large platter garnished with holiday greenery like pine branches for a natural, rustic display. Or try stacking the brownies like a forest of trees on a tiered stand for a dramatic centerpiece everyone will admire before digging in.
Make Ahead and Storage
Storing Leftovers
Store any leftover Brownie Christmas Trees in an airtight container at room temperature for up to three days. This keeps the brownies soft and the frosting fresh, ready to be enjoyed as a sweet treat on demand.
Freezing
If you want to prepare your brownies in advance, freeze the cooled, uncut brownies wrapped tightly in plastic wrap and foil. When ready to use, thaw completely before cutting and decorating to maintain the best texture and flavor.
Reheating
While these are best enjoyed at room temperature, if you prefer a warm brownie, heat a single piece in the microwave for about 10 seconds. Avoid reheating decorated brownies to keep frosting intact and sprinkles looking festive.
FAQs
Can I use homemade brownies for this recipe?
Absolutely! Homemade brownies can be used in place of a boxed mix. Just be sure to bake them in a 9×9 pan and cool completely before decorating and cutting into tree shapes.
How do I prevent the brownies from crumbling when cutting?
Make sure the brownies are completely cooled or even chilled before cutting. Using a sharp knife and gently wiping it clean between cuts helps achieve neat triangles without crumbling.
Can I use different colors of frosting?
Yes! Feel free to get creative with your frosting colors to match your holiday décor or party theme. Red, white, or even a sparkly frost can give your Brownie Christmas Trees Recipe a unique twist.
What if I don’t have candy canes—what can I use as trunks?
If candy canes aren’t available, small pretzel sticks or chocolate-covered biscuit sticks make excellent alternative “trunks” for your brownie trees.
Are these brownies suitable for children to help make?
Definitely! The mixing and decorating steps are perfect for little hands. Just be sure an adult handles the cutting and baking parts to keep everyone safe and involved.
Final Thoughts
There’s something truly special about bringing a bit of festive joy to your kitchen, and this Brownie Christmas Trees Recipe does just that with its combination of delicious chocolate, bright green frosting, and playful candy cane accents. These brownies aren’t just desserts; they’re a celebration of the season you can share with family and friends. So grab your ingredients, roll up your sleeves, and make this joyful recipe part of your holiday tradition—you’ll be so glad you did!
Print
Brownie Christmas Trees Recipe
- Prep Time: 20 minutes
- Cook Time: 35 minutes
- Total Time: 55 minutes
- Yield: 18 small trees or 8 large trees
- Category: Dessert
- Method: Baking
- Cuisine: American
Description
Delightfully festive and easy-to-make Brownie Christmas Trees, perfect for holiday celebrations. These delicious brownies are transformed into charming Christmas tree shapes, decorated with green-tinted frosting, sprinkles, and candy canes for a fun and festive treat that kids and adults will love.
Ingredients
Brownie Base
- 1 (18 oz.) box brownie mix
- Ingredients called for on back of box (usually oil, eggs, and water)
- 1 additional egg yolk
Decorations
- 1 (16 oz.) tub vanilla frosting
- Green food coloring
- Sprinkles
- Candy canes
Instructions
- Preheat Oven: Preheat the oven to the temperature recommended on the brownie mix box to ensure optimal baking.
- Prepare Pan: Line a 9×9-inch baking pan with parchment paper, allowing extra parchment to hang over edges for easy removal later.
- Mix Batter: In a large bowl, whisk together the brownie mix ingredients as instructed on the box, adding 1 additional egg yolk. Mix just until the flour disappears to avoid over-mixing.
- Bake Brownies: Pour the batter into the prepared pan and bake according to the box directions. Start checking a few minutes before the minimum time to prevent overbaking.
- Cool Brownies: Allow brownies to cool in the pan on a wire rack thoroughly to set properly.
- Prepare Frosting: While brownies cool, mix the vanilla frosting with green food coloring until the desired shade is achieved.
- Remove and Trim: Lift brownies out of the pan using the parchment paper edges and trim off the outer edges for neatness.
- Ensure Cooling: Wait until brownies are completely cooled before cutting. If needed, refrigerate to speed cooling.
- Cut Small Trees: For 18 small trees, cut brownies into 3 long strips, cut each strip into 3 equal squares, then cut each square diagonally to form triangles (6 per strip).
- Cut Large Trees: For 8 large trees, cut brownies in half down the middle, then slice each half into 4 triangles, trimming ends at an angle for a zig-zag pattern.
- Decorate: Spread green frosting on each triangle, add sprinkles for decoration, and insert a cut candy cane at the bottom as the tree trunk.
Notes
- Do not over-mix brownie batter to maintain a tender texture.
- Check brownies early during baking to avoid dryness.
- Completely cool brownies before cutting for clean edges and easier decorating.
- Use parchment paper for easy removal and cleanup.
- Adjust food coloring to achieve your preferred shade of green.
- Decorate immediately after frosting for best results.
