“`html
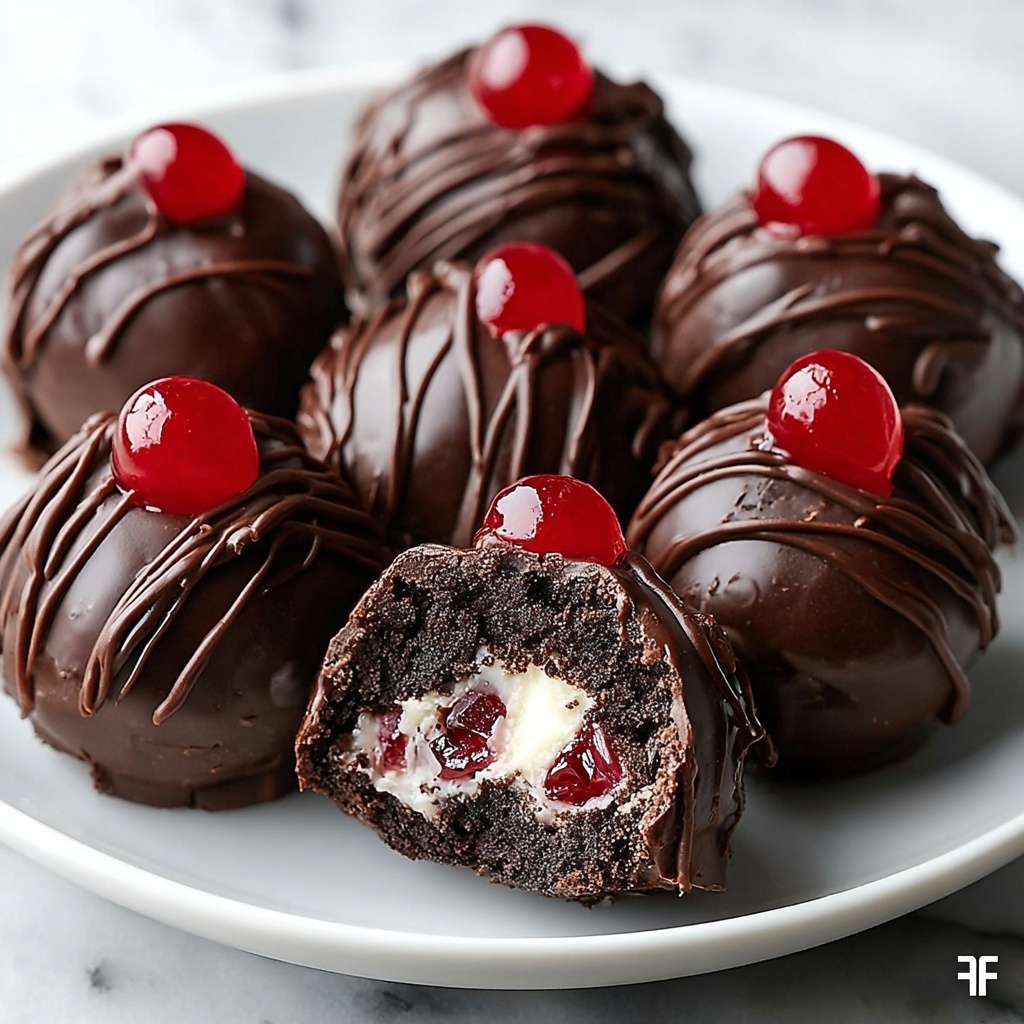
If you’re someone who loves the magical marriage of rich chocolate and bright, juicy cherries, you’re going to fall head over heels for the Black Forest Cookie Dough Brownie Bombs Recipe. This extraordinary dessert combines fudgy brownies, luscious cherry-infused cookie dough, and a decadent chocolate coating to create little bites of pure joy. Each bomb explodes with flavor and texture, making it the ultimate treat for celebrations or any day you want to feel a little extra special in the kitchen.
Ingredients You’ll Need
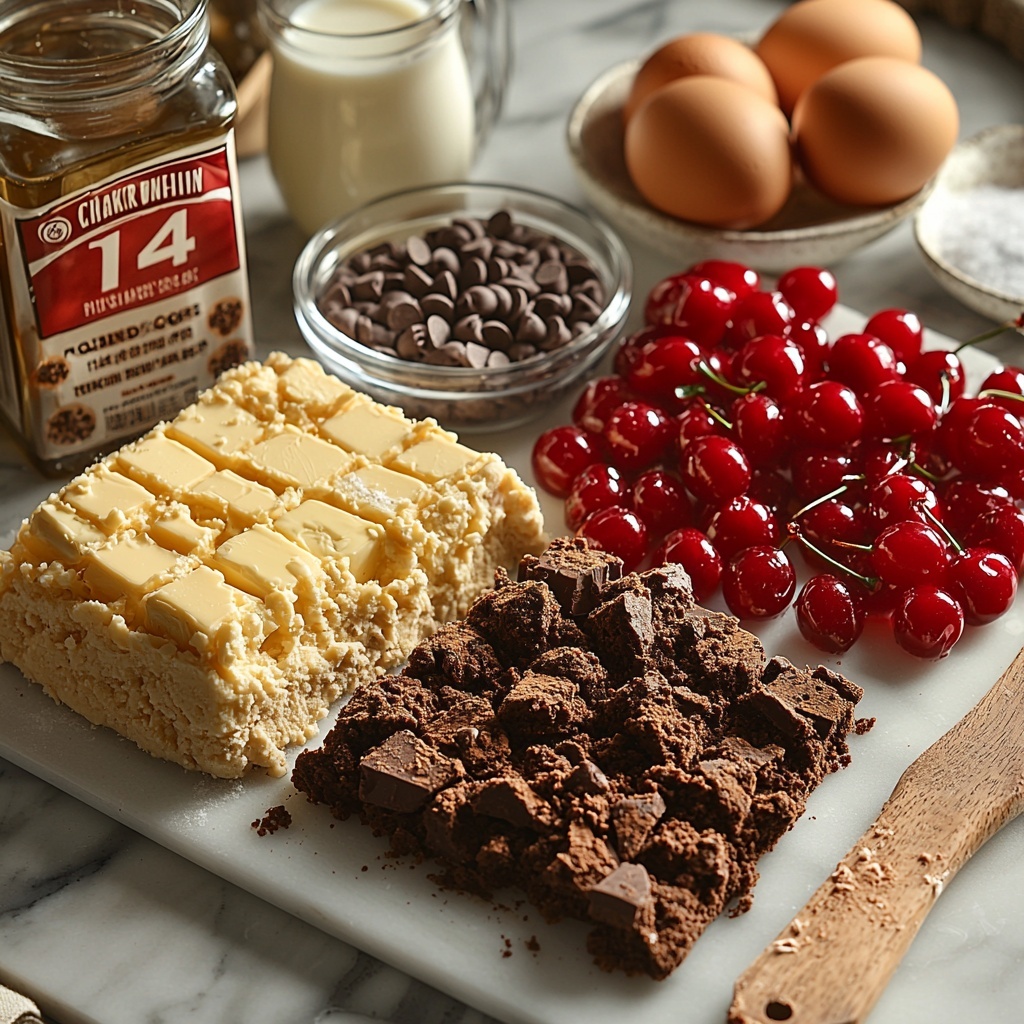
The beauty of the Black Forest Cookie Dough Brownie Bombs Recipe lies in its accessible ingredients that come together to build powerhouse flavors and textures. From fudgy brownie base to the creamy cherry cookie dough and the shiny chocolate shell, each component plays a crucial role in making these bombs irresistible.
- Brownie mix: Choosing your favorite boxed mix or your go-to homemade brownie recipe ensures that you start with a deeply chocolatey and moist foundation.
- Eggs, oil, and water: These are typically required by the brownie mix to create the perfect texture and moisture balance in the brownies.
- Unsalted butter, softened: Provides rich creaminess and tenderness to the cookie dough without being too salty.
- Brown sugar, packed: Adds warmth and chewiness to the cookie dough, enhancing that classic cookie flavor.
- Vanilla extract: A small but essential addition, it brings depth and rounds out the sweetness beautifully.
- All-purpose flour: The structure builder for the cookie dough, giving it that delightful chewiness.
- Maraschino cherries, chopped: These bring that burst of iconic Black Forest flavor and a vibrant pop of color inside the cookie dough.
- Mini chocolate chips: Provide little pockets of chocolate goodness inside the cherry cookie dough.
- Milk: Used sparingly to adjust the dough’s consistency to a perfectly soft, scoopable texture.
- Pinch of salt: Enhances all the sweet flavors, making everything taste more balanced and rich.
- Semisweet chocolate chips or melting wafers: The glossy coating that encases each brownie bomb, sealing all those luscious flavors within.
- Sprinkles or extra chopped cherries (optional): For a playful and festive finishing touch on top of the chocolate shell.
How to Make Black Forest Cookie Dough Brownie Bombs Recipe
Step 1: Prepare the Brownie Base
Start by preheating your oven as directed on your brownie mix box or recipe. Grease your baking dish well so the brownies come out easily, then prepare the batter following the package or recipe instructions. Bake as instructed, then set the brownies aside to cool completely — this step is key because warm brownies will create a messy, melty situation when you try to crumble them later.
Step 2: Crumble the Brownies
Once the brownies have cooled, crumble them into small, uniform pieces. These crumbles will be used to coat the cherry cookie dough balls, forming the outside layer of your Black Forest Cookie Dough Brownie Bombs Recipe. Set the crumbled brownies aside in a bowl.
Step 3: Make the Cherry Cookie Dough
In a large mixing bowl, cream together the softened butter and packed brown sugar until light and fluffy. This process takes a few minutes but is so worth it for the dreamy texture it creates. Next, mix in the vanilla extract to bring those sweet notes to life. Slowly combine the flour and a pinch of salt, stirring until everything is just combined. Add milk one tablespoon at a time until your dough reaches a soft, scoopable consistency—not too dry and not sticky.
Step 4: Fold in Cherries and Chocolate Chips
Gently fold in the chopped maraschino cherries and mini chocolate chips, distributing the exciting flavors evenly throughout the dough. Pop the dough into the refrigerator for 20 to 30 minutes to chill and firm up; this makes it easier to work with in the next step.
Step 5: Form the Brownie Bombs
Take a small scoop of the chilled cherry cookie dough and roll it into a ball. Then, flatten a small handful of the crumbled brownies in your palm and wrap it entirely around the cookie dough ball, sealing any gaps to create a smooth, bomb-shaped treat. Repeat this process until all the dough and brownie crumbs are used up.
Step 6: Freeze and Prepare for Chocolate Coating
Place your brownie bombs on a parchment-lined baking sheet and freeze for 30 minutes. The chilling step is crucial as it allows the bombs to firm up so they hold their shape when dipped in melted chocolate.
Step 7: Dip in Melted Chocolate
In a microwave-safe bowl, melt the semisweet chocolate chips or melting wafers, stirring every 20 to 30 seconds until smooth and glossy. Carefully dip each brownie bomb into the melted chocolate, ensuring they are completely coated. Set them back on the parchment paper and quickly add sprinkles or extra chopped cherries if you want an extra festive flair while the chocolate is still wet.
Step 8: Set and Serve
Refrigerate the dipped brownie bombs until the chocolate shell hardens completely. Serve chilled or at room temperature to enjoy that addictive combo of gooey brownie, chewy cherry cookie dough, and crisp chocolate shell.
How to Serve Black Forest Cookie Dough Brownie Bombs Recipe
Garnishes
Sprinkles are a colorful and playful way to elevate your Black Forest Cookie Dough Brownie Bombs Recipe presentation, adding texture and visual appeal. Freshly chopped cherries on top offer a burst of juicy fruitiness and reflect the Black Forest inspiration perfectly.
Side Dishes
Pair these indulgent brownie bombs with a scoop of smooth vanilla ice cream for contrast or a dollop of whipped cream to balance the richness. A fresh cherry compote or drizzle of chocolate sauce on the side makes for an elegant dessert plate.
Creative Ways to Present
Try serving these treats in mini cupcake liners or arrange them on a pretty platter garnished with fresh berries and mint leaves. For parties, they work beautifully as dessert table centerpieces or fancy bite-sized snacks stacked in tiers.
Make Ahead and Storage
Storing Leftovers
Store leftover Black Forest Cookie Dough Brownie Bombs Recipe in an airtight container in the refrigerator. They’ll stay fresh for about 4 to 5 days while maintaining their texture and flavor.
Freezing
You can freeze these brownie bombs for up to 2 months. Place them in a single layer on a baking sheet to freeze initially, then transfer to a sealed container or freezer bag to avoid freezer burn.
Reheating
For the best taste, let frozen brownie bombs thaw in the fridge overnight. If you prefer them slightly warmed, gently microwave for 10-15 seconds, but be careful not to soften the chocolate shell too much.
FAQs
Can I use homemade brownies instead of a mix?
Absolutely! Homemade brownies add a personal touch, and as long as they’re rich and fudgy, they’ll work wonderfully in this recipe.
Are these safe to eat raw since they contain cookie dough?
This recipe uses heat-treated flour and no raw eggs in the cookie dough, making it safe to enjoy the dough without worry.
Can I substitute fresh cherries for maraschino cherries?
Fresh cherries are delicious but may add extra moisture to the dough, affecting texture, so chopping and draining them well is key. Maraschino cherries offer convenience and a consistent chewy texture.
What chocolate works best for coating?
Semisweet chocolate chips or melting wafers are ideal because they melt smoothly and set with a beautiful sheen.
How long do these brownie bombs last at room temperature?
They can sit out for a few hours, perfect for parties, but should be refrigerated afterward to keep them fresh and safe.
Final Thoughts
If you’re ready to wow your friends and family with a dessert that’s truly unforgettable, the Black Forest Cookie Dough Brownie Bombs Recipe is your new best friend. Each bite delivers a dazzling combo of textures and flavors that’s as fun to make as it is to eat. Trust me – once you try these, you’ll be dreaming up excuses to bake them again and again!
“`
Print
Delicious Recipe
- Prep Time: 25 minutes
- Cook Time: 25 minutes
- Total Time: 1 hour 20 minutes
- Yield: 12-15 brownie bombs
- Category: Dessert
- Method: Baking
- Cuisine: American
Description
These Black Forest Cookie Dough Brownie Bombs combine the rich, fudgy goodness of brownies with a luscious cherry-studded cookie dough center, all encased in a smooth chocolate coating. Perfect as an indulgent treat, they offer the classic Black Forest flavor in a fun, bite-sized dessert.
Ingredients
For the Brownies:
- 1 box of your favorite brownie mix (or homemade brown mix equivalent)
- Ingredients listed on the brownie mix box (usually eggs, oil, and water)
For the Cherry Cookie Dough:
- 1/2 cup unsalted butter, softened
- 3/4 cup brown sugar, packed
- 2 teaspoons vanilla extract
- 1 1/2 cups all-purpose flour
- 1/2 cup maraschino cherries, chopped
- 1/4 cup mini chocolate chips
- 2–3 tablespoons milk (as needed)
- Pinch of salt
For the Coating:
- 2 cups semisweet chocolate chips or chocolate melting wafers
- Sprinkles or extra chopped cherries for garnish (optional)
Instructions
- Prepare Brownies: Preheat your oven according to the brownie mix instructions. Grease a baking dish and prepare the brownie batter as directed on the box or from your homemade recipe.
- Bake and Cool Brownies: Bake the brownies as per the instructions until cooked through. Allow them to cool completely to room temperature before handling.
- Crumble Brownies: Once cooled, crumble the brownies into small pieces using your hands or a fork and set aside.
- Make Cherry Cookie Dough: In a large bowl, cream together the softened butter and brown sugar until light and fluffy using a mixer or hand whisk.
- Add Vanilla and Flour: Mix in the vanilla extract, then gradually add the all-purpose flour and a pinch of salt, stirring until combined. Add milk one tablespoon at a time until the dough reaches a soft, pliable consistency.
- Fold in Cherries and Chocolate: Gently fold the chopped maraschino cherries and mini chocolate chips into the dough. Refrigerate the dough for 20-30 minutes to firm up.
- Assemble Brownie Bombs: Take a small scoop of the chilled cherry cookie dough and roll it into a ball. Flatten a piece of crumbled brownie in your hand, then wrap it around the cookie dough ball completely sealing it. Repeat for all dough and brownies.
- Freeze Brownie Bombs: Place the assembled brownie bombs on a parchment-lined baking sheet and freeze for 30 minutes to firm up and hold their shape.
- Melt Chocolate Coating: Melt the semisweet chocolate chips or melting wafers in a microwave-safe bowl by heating in 20-30 second intervals, stirring until smooth and fully melted.
- Coat Brownie Bombs: Dip each frozen brownie bomb into the melted chocolate, ensuring it is fully coated, then place them back onto the parchment-lined sheet.
- Add Garnishes: While the chocolate coating is still wet, garnish with sprinkles or extra chopped cherries if desired for decoration and an extra burst of flavor.
- Set Coating and Serve: Refrigerate the coated brownie bombs until the chocolate is fully set. Serve chilled or at room temperature for a decadent, Black Forest-inspired treat.
Notes
- Use a quality brownie mix or homemade brownie recipe for best results.
- Make sure brownies are completely cool before crumbling to prevent the dough balls from becoming soggy.
- Slightly chill the cookie dough before assembling for easier handling.
- Freeze the brownie bombs prior to dipping to help maintain shape during coating.
- Adjust milk quantity in cookie dough to achieve a soft but firm texture without being too sticky.
- Store finished brownie bombs refrigerated in an airtight container for up to 5 days.
- Allow brownie bombs to come to room temperature before eating for optimal flavor and texture.


