
If you’ve ever wanted to capture the vibrant, juicy sweetness of fresh cherries in a spreadable treat, you’re going to love this Small Batch Cherry Jam Recipe. It’s perfectly sized so you won’t end up with jars collecting dust in the back of your fridge, and the result is a gorgeous, rich jam that bursts with natural cherry flavor and just the right touch of lemon brightness. Whether you’re a canning newbie or a jam enthusiast, this recipe feels like a warm hug in a jar and will easily become a staple in your kitchen.
Ingredients You’ll Need
Keeping things simple is the key here. Each ingredient plays a crucial role in bringing that perfect balance of sweetness, tartness, and texture to your Small Batch Cherry Jam Recipe. Let’s take a look at these essentials that you probably already have on hand, and why they matter.
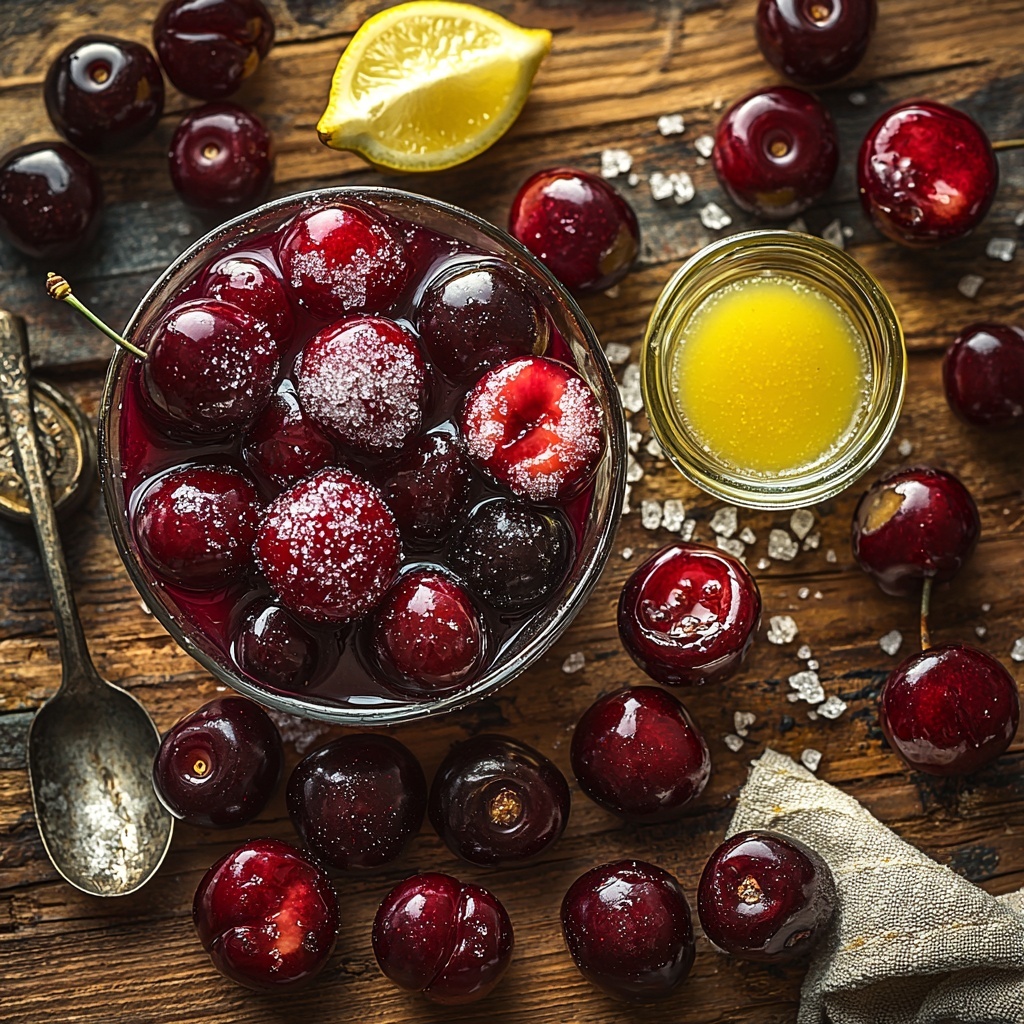
- 2½ cups (400 g) halved and pitted sweet cherries: The star of the show, fresh or frozen, these cherries give the jam its vibrant color and juicy flavor.
- 1 cup (200 g) granulated sugar: This sweetener helps the jam set up properly while balancing the natural tartness of the cherries.
- 2 Tablespoons (30 ml) lemon juice: The acidity from fresh lemon juice brightens the flavor and helps with the jam’s natural gel formation.
How to Make Small Batch Cherry Jam Recipe
Step 1: Combine Your Ingredients
Start by placing your halved and pitted cherries, sugar, and lemon juice into a medium saucepan. It’s best to use a pot just the right size so you can keep an eye on your jam as it thickens, preventing any scorching at the bottom.
Step 2: Heat and Dissolve the Sugar
Turn your stove to medium and gently stir the mixture. You’ll notice the sugar gradually dissolving and the syrup turning a deep, luscious red. This part takes about 5 minutes for fresh cherries and closer to 10 minutes if they’re frozen, so be patient and stir occasionally to ensure even heating.
Step 3: Boil and Thicken the Jam
Now crank the heat up to bring your cherry mixture to a rolling boil — the kind you just can’t stir down. Keep it bubbling enthusiastically for 8 to 10 minutes, stirring as needed. You’re looking for the jam to thicken and reach about 220°F (105°C) on a candy thermometer, a key temperature that signals perfect set. A simple test is to drop a little jam on a chilled plate; if it holds its shape without running, you’re right on track.
Step 4: Blend the Jam to Your Preferred Texture
Once the jam is thick and glossy, remove the pot from heat and grab an immersion blender. Pulse for a few seconds at a time to break down the cherry pieces to your liking. Whether you prefer some chunky texture or a smoother consistency, this step lets you control the final feel of your jam. Just make sure the blender stays submerged so it all blends uniformly.
Step 5: Jar and Chill
Pour the hot cherry jam carefully into clean jars. Seal them tightly and pop them into the fridge. The jam will continue to thicken as it cools, so for the best flavor and texture, give it at least overnight before you dig in. This rest time really allows the flavors to meld beautifully.
How to Serve Small Batch Cherry Jam Recipe
Garnishes
A little fresh mint or a sprinkle of finely chopped toasted almonds on top of your cherry jam toast can elevate it instantly. The mint adds a fresh contrast, and the almonds bring a delicate crunch that pairs wonderfully with the smooth, sweet-sour jam.
Side Dishes
Small Batch Cherry Jam isn’t just for toast. It’s spectacular alongside cheese boards, especially with creamy brie or tangy goat cheese. Try serving it with buttery crackers or alongside roasted meats where the sweet cherry notes add a surprising depth.
Creative Ways to Present
For a charming presentation, try layering this cherry jam between dollops of whipped cream or mascarpone in small glasses for an easy dessert parfait. Or stuff it inside thumbprint cookies or use as a glaze for pound cakes to share the joy of this homemade spread in unexpected ways.
Make Ahead and Storage
Storing Leftovers
Once sealed in the fridge, your Small Batch Cherry Jam Recipe will stay fresh and delicious for 3 to 4 days. Keep the jar tightly closed to preserve that vibrant cherry flavor and prevent it from absorbing fridge odors.
Freezing
If you want to keep your cherry jam longer, freezing is a great option. Transfer the jam to a freezer-safe container, leaving some headspace for expansion, and freeze for up to 3 months. Thaw overnight in the fridge before using, and give it a gentle stir to restore the smooth texture.
Reheating
When it’s time to enjoy frozen jam, a quick gentle warm-up in a small saucepan over low heat is all you need. This will loosen the jam, making it easy to spread or drizzle, while refreshing its fresh-cooked flavor.
FAQs
Can I use frozen cherries instead of fresh for this recipe?
Absolutely! Frozen cherries work perfectly in this Small Batch Cherry Jam Recipe. Just thaw them slightly and be prepared for a slightly longer simmer time to fully dissolve the sugar and thicken the jam.
Do I really need to use lemon juice?
Yes, lemon juice is essential here. It adds necessary acidity that balances the sweetness and helps the jam set properly, giving you that perfect spreadable texture.
How can I tell when the jam is done?
A reliable way is to check the temperature with a candy thermometer — 220°F (105°C) is your target. Alternatively, a cool plate test works well: drop a small spoonful of jam on a cold plate and see if it stays put without running.
Can I store this jam at room temperature?
This particular recipe is best stored in the refrigerator after cooking since it’s a small batch without added preservatives or a full canning process. Keeping it chilled will maintain its freshness and safety.
Do I have to blend the jam?
Not at all! Blending is optional and entirely up to your texture preference. If you like chunkier jam with whole cherry pieces, feel free to skip the immersion blender step.
Final Thoughts
There’s something truly special about making your own Small Batch Cherry Jam Recipe, capturing the essence of fresh cherries in a spread that feels both homemade and indulgent. It’s simple, quick, and endlessly versatile — perfect for anyone who loves to add a little homemade magic to their mornings or snacks. I encourage you to give it a go, and watch how quickly this little jar becomes your new favorite pantry treasure.
Print
Small Batch Cherry Jam Recipe
- Prep Time: 10 minutes
- Cook Time: 25 minutes
- Total Time: 8 hours 35 minutes (including cooling and setting time)
- Yield: About 1¾ cups (approximately 14 servings, 2 tablespoons each)
- Category: Preserves
- Method: Stovetop
- Cuisine: American
- Diet: Vegetarian
Description
This small batch cherry jam recipe yields a sweet, vibrant, and fresh homemade preserve using fresh or frozen sweet cherries. Easy to make on the stovetop, it involves cooking cherries with sugar and lemon juice into a thick, luscious jam, perfect for spreading on toast or adding to desserts. The recipe makes about 14 servings and is ideal for those who want to preserve cherries without making a large quantity.
Ingredients
Jam Ingredients
- 2½ cups (400 g) halved and pitted sweet cherries, fresh or frozen
- 1 cup (200 g) granulated sugar
- 2 Tablespoons (30 ml) lemon juice, from about one lemon
Instructions
- Combine Ingredients: In a medium pot, add the prepared cherries, sugar, and lemon juice, ensuring all ingredients are well mixed before cooking.
- Heat and Dissolve Sugar: Place the pot over medium heat and stir occasionally until the sugar completely dissolves and the syrup turns a dark red color. This step takes about 5 minutes for fresh cherries, or about 10 minutes if using frozen cherries.
- Boil and Thicken: Increase the heat to bring the mixture to a rolling boil that cannot be stirred down. Let it boil for 8 to 10 minutes, stirring as needed, until the jam thickens and reaches 220°F (105°C). Test by dropping a bit on a cold plate—if it spreads too much, continue cooking and test again. Once it holds its shape, the jam is ready.
- Blend the Jam: Remove the pot from heat and use an immersion blender to gently break up the cherry pieces. Blend in short bursts just enough to eliminate large chunks, tilting the pot to keep the blender head submerged if necessary.
- Jar and Chill: Pour the hot cherry jam into clean jars, seal tightly, and refrigerate. The jam will thicken further as it cools. For best flavor and texture, let it set overnight before serving.
Notes
- Use ripe, sweet cherries for the best flavor; tart cherries can be used but may require adjusting the sugar.
- If you do not have an immersion blender, you can mash the cherries with a potato masher for a chunkier texture.
- This recipe does not require pectin, relying on natural fruit pectin and cooking time to thicken.
- Store refrigerated jam in sealed jars and consume within 2 to 3 weeks.
- To preserve longer, consider sterilizing jars and processing the jam using proper canning procedures (not covered in this recipe).


