
If you’ve ever wished for a luscious, fruit-packed filling that elevates every dessert, then this Homemade Cherry Pie Filling Recipe is going to be your new best friend. Bright, sweet, and perfectly thickened, it transforms simple cherries into a mouthwatering experience that shines in pies, tarts, and even on top of ice cream. Making your own cherry pie filling at home means you get full control over the flavors and texture, ensuring every bite bursts with fresh cherry goodness and just the right amount of sweetness and zing.
Ingredients You’ll Need
This list is wonderfully simple but packed with ingredients that work harmoniously to create a vibrant, flavorful filling. Each one plays an important role in balancing sweetness, thickening the filling, and bringing out the natural cherry essence.
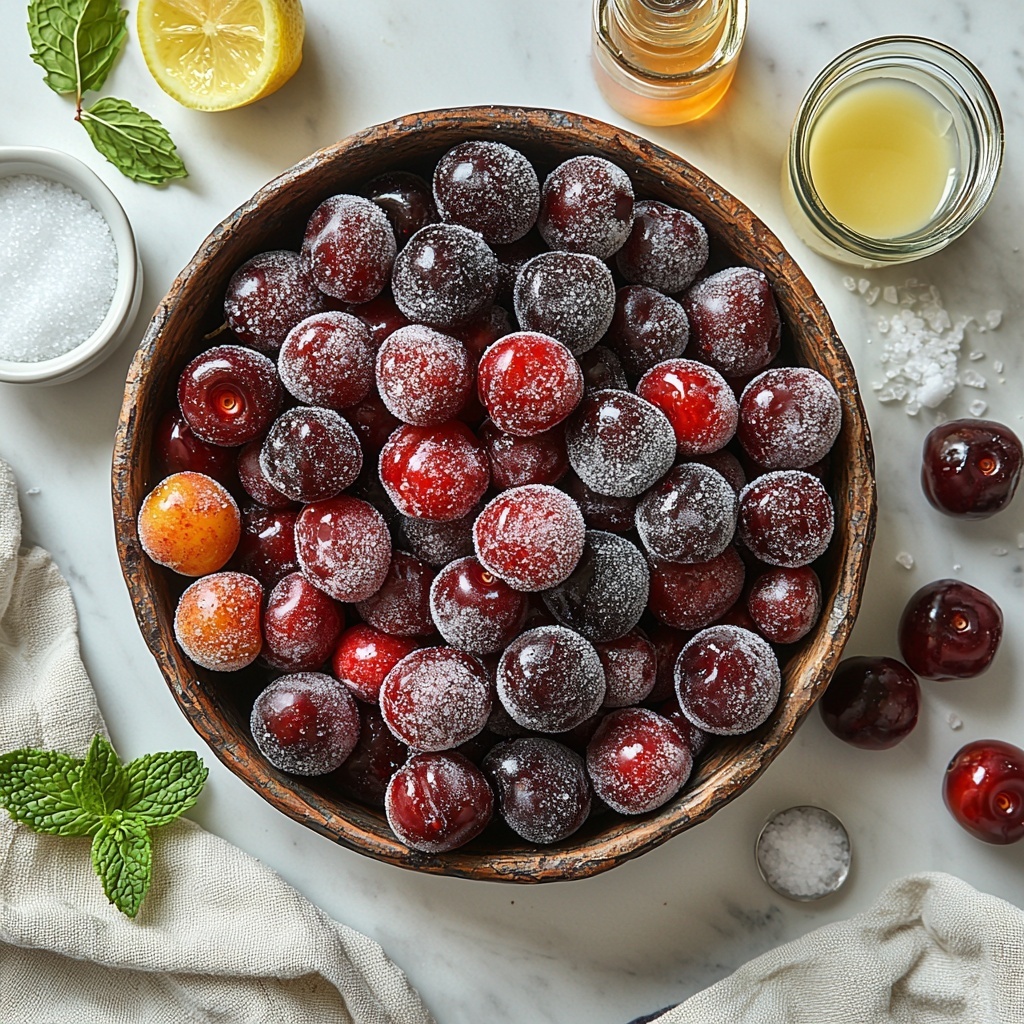
- 4 cups fresh or frozen cherries, pitted: The star of the show—juicy cherries deliver both color and that unmistakable tart-sweet flavor.
- 1 cup granulated sugar: Sweetens the cherries and helps develop a rich syrupy consistency.
- 1/4 cup cornstarch: The magic thickener that makes the filling hold together beautifully without feeling gloopy.
- 1/4 tsp salt: Enhances all the flavors, balancing out the sweetness for a well-rounded taste.
- 1 tbsp lemon juice: Adds a touch of brightness and acidity that lifts the cherries’ natural flavor.
- 1/2 cup water: Helps dissolve the sugar and cornstarch, creating that silky filling texture.
- 1/2 tsp almond extract (optional): A subtle nutty note that complements cherries perfectly and adds depth.
How to Make Homemade Cherry Pie Filling Recipe
Step 1: Combine Ingredients
Start by placing your fresh or frozen pitted cherries into a large saucepan. Add the sugar, cornstarch, and salt. Then pour in the lemon juice and water. Stir everything together thoroughly so the granulated sugar begins to blend with the fruit juice and the cornstarch is evenly dispersed. This even mixing is crucial for helping the filling thicken later without any lumps.
Step 2: Cook the Mixture
Put the saucepan over medium heat and keep stirring frequently. You’ll notice the mixture slowly coming to a gentle bubble and gradually thickening. This step typically takes about 5 to 10 minutes. Patience is key here to ensure the fruit cooks down just right and the cornstarch activates fully, turning the liquid silky and glossy.
Step 3: Add Almond Extract (If Using)
Once your filling has thickened nicely, remove the pan from the heat. If you like, stir in half a teaspoon of almond extract—that lovely flavor pairs wonderfully with cherries and adds a fragrant complexity to the filling. This little addition takes your Homemade Cherry Pie Filling Recipe to another level of deliciousness.
Step 4: Cool and Use
Allow the filling to cool to room temperature before using it in your pies, cobblers, or other desserts. Cooling helps it set perfectly and makes it easier to work with when assembling your sweet creations. Trust me, the wait is worth it!
How to Serve Homemade Cherry Pie Filling Recipe
Garnishes
Once your cherry pie or dessert is baked, adding a simple garnish can make it feel extra special. A dollop of freshly whipped cream or a sprinkle of sliced almonds adds texture and richness, while a few fresh mint leaves offer a refreshing contrast to the sweetness of the filling.
Side Dishes
This filling shines as a topping for vanilla ice cream or alongside a scoop of creamy Greek yogurt for a lighter, balanced dessert. It also pairs beautifully with a buttery shortbread cookie or a slice of pound cake, where the juicy cherries bring a fruity punch that complements the buttery richness.
Creative Ways to Present
Why stop at pie? Use this Homemade Cherry Pie Filling Recipe to fill puff pastry turnovers, swirl it into cheesecake batter before baking, or layer it between yogurt parfaits for a vibrant burst of flavor. The possibilities are endless, and each one is an opportunity to enjoy cherries in a fresh, exciting way.
Make Ahead and Storage
Storing Leftovers
If you happen to have leftover cherry pie filling, store it in an airtight container in the refrigerator. It will keep beautifully for 3-4 days, maintaining its tangy sweetness and thick texture, ready for you to enjoy in another dessert or breakfast treat.
Freezing
You can also freeze your Homemade Cherry Pie Filling Recipe for longer storage. Pour the cooled filling into a freezer-safe container or resealable bag and freeze for up to 3 months. When thawed, the filling may separate slightly but stirring it gently will bring it back to the perfect consistency.
Reheating
To reheat, simply warm the filling over low heat on the stove, stirring occasionally until heated through. This prevents scorching and helps reintegrate any separation. It’s just as delicious warmed, perfect for topping pancakes or waffles.
FAQs
Can I use frozen cherries instead of fresh?
Absolutely! Frozen cherries work wonderfully in this recipe and often make it even easier since they’re already pitted. Just thaw them slightly before starting to avoid excess water diluting the filling too much.
Is the almond extract necessary?
The almond extract is optional but highly recommended if you love that classic cherry-almond flavor profile. If you’re not a fan or need to avoid nuts, simply leave it out; the filling will still taste fantastic.
Can I make this filling in advance for a pie?
Yes! Making the filling ahead of time saves you a step on pie day. Store it refrigerated for up to 3-4 days or freeze for later use. Just be sure to cool it completely before refrigeration or freezing.
How thick will the filling be once cooked?
Thanks to the cornstarch, your filling should have a pleasantly thick, gel-like texture that holds together well when sliced but still spoonable. If it seems too runny, you can cook it a bit longer to reduce it further.
Can I adjust the sweetness?
Definitely! Feel free to add less sugar if you prefer a tarter filling or increase it slightly for a sweeter result. Taste as you cook to find the perfect balance for your palate.
Final Thoughts
Making your own Homemade Cherry Pie Filling Recipe is such a rewarding experience that brings fresh, homemade flavor to every dessert you create. Whether tucked inside a flaky pie crust or drizzled over ice cream, it’s a timeless way to celebrate cherries at their best. Give it a try—you might find it becomes your go-to cherry filling for all your baking adventures!
Print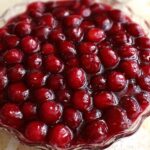
Homemade Cherry Pie Filling Recipe
- Prep Time: 5 minutes
- Cook Time: 15 minutes
- Total Time: 20 minutes
- Yield: 5 servings
- Category: Dessert
- Method: Stovetop
- Cuisine: American
Description
This homemade cherry pie filling recipe is a simple and delicious way to create a classic dessert component using fresh or frozen cherries. Perfectly sweetened and thickened with cornstarch, it offers a luscious cherry filling ideal for pies, tarts, or other desserts.
Ingredients
Pie Filling
- 4 cups fresh or frozen cherries, pitted
- 1 cup granulated sugar
- 1/4 cup cornstarch
- 1/4 teaspoon salt
- 1 tablespoon lemon juice
- 1/2 cup water
- 1/2 teaspoon almond extract (optional)
Instructions
- Combine Ingredients: In a large saucepan, combine the pitted cherries, granulated sugar, cornstarch, and salt. Stir in the lemon juice and water, mixing everything well to ensure the cornstarch dissolves evenly.
- Cook Mixture: Place the saucepan over medium heat. Cook the mixture, stirring frequently to prevent sticking, until it begins to bubble and thickens, approximately 5 to 10 minutes.
- Add Flavoring: If desired, stir in the almond extract to enhance the cherry flavor and blend well.
- Cool Filling: Remove the thickened cherry filling from heat and allow it to cool completely before using it in pies, tarts, or other desserts.
Notes
- For best results, use fresh cherries when in season or high-quality frozen cherries.
- The almond extract is optional but adds a lovely complementary flavor to the cherry filling.
- Make sure to stir constantly while cooking to avoid lumps and prevent burning.
- This filling can be stored in an airtight container in the refrigerator for up to 5 days or frozen for longer storage.
