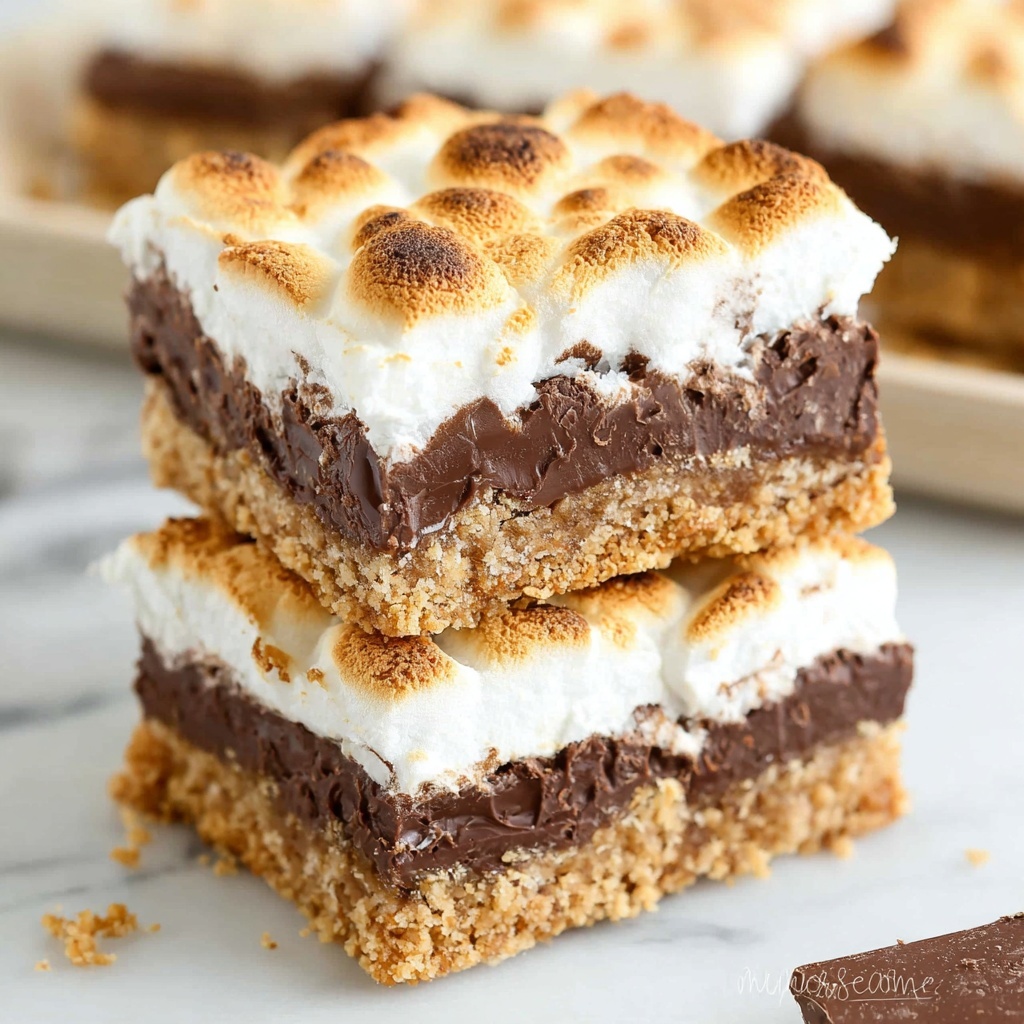
If you have a soft spot for all things sweet, ooey, and perfectly melty, then this S’mores Bars Recipe is going to become your new obsession. Imagine the nostalgic charm of a campfire classic transformed into a decadent, easy-to-make treat that works any time of year. With a crisp and buttery graham cracker crust, a layer of glossy melted chocolate, and a cloud of toasted marshmallows on top, these bars deliver all the joy of s’mores in every bite. Trust me, once you try this S’mores Bars Recipe, you’ll be dreaming up excuses to make it again and again.

Ingredients You’ll Need
The magic of this S’mores Bars Recipe lies in a handful of simple ingredients that each play a vital role. From the crunchy base to the gooey topping, every component is essential for that perfect balance of texture and flavor.
- Graham cracker crumbs: Provides the classic slightly sweet and crunchy foundation essential to s’mores.
- Butter (melted): Binds the crumbs together while adding rich flavor and helping the crust crisp up.
- Powdered sugar: Adds a subtle sweetness to support the buttery crust without overwhelming.
- Hershey Chocolate Bars: Gives that smooth, melty chocolate layer that’s the heart of any s’mores.
- Mini marshmallows: Creates a pillowy, toasted-topping that completes the nostalgic flavor profile.
How to Make S’mores Bars Recipe
Step 1: Preparing the crust
Start by preheating your oven to 350 degrees Fahrenheit and greasing a 9×13 pan with non-stick butter spray. In a medium bowl, combine the graham cracker crumbs, powdered sugar, and melted butter. Stir until everything is thoroughly mixed and the crumbs feel evenly coated. This mixture will form the crispy, buttery base that holds all the goodness together.
Step 2: Pressing and baking the crust
Press the graham cracker mixture firmly along the bottom and slightly up the sides of the pan using your fingers. Make sure it’s packed tightly to avoid crumbling later. Pop the pan into the oven and bake for about 5 to 8 minutes, or until the edges just start to turn a golden brown. Keep an eye on it because this is the first step towards building a crust that sets perfectly once cooled.
Step 3: Adding the chocolate layer
After the crust cools, arrange the Hershey chocolate bars over the top, covering the graham cracker base completely. Return the pan to the oven for around 3 minutes. Watch as the chocolate begins to melt and takes on a shiny, luscious look—that’s your signal it’s ready for the next layer.
Step 4: Adding marshmallows and broiling
Once the chocolate is glossy and warm, sprinkle mini marshmallows evenly over the surface, packing them close to each other for that perfect gooey top. Switch your oven to the broil setting and slide the pan in for just about 2 minutes. Be vigilant here—marshmallows toast quickly and can burn if not watched carefully. When they achieve a golden brown with delightful little toasted spots, pull them out immediately.
Step 5: Cooling and serving
Allow the bars to cool completely before slicing. For cleaner cuts, pop them in the refrigerator to help them set even more. When slicing, use a sharp knife warmed under hot water and dried, which helps prevent sticking. You might need to repeat this warming step between cuts to keep your slices looking neat and delicious.
How to Serve S’mores Bars Recipe
Garnishes
To amp up presentation, sprinkle a few extra mini marshmallows or grated chocolate on top just before serving. A light dusting of powdered sugar also adds a snowy, festive touch that feels extra special.
Side Dishes
Pair your S’mores Bars with a cold glass of milk or a rich cup of hot cocoa to complement the sweet richness. Fresh berries or a dollop of whipped cream also provide a refreshing contrast to the dense bar.
Creative Ways to Present
Serve these bars on a wooden cutting board or a rustic tray for a cozy, campfire vibe. For parties, arrange the bars on a platter with skewers nearby so guests can easily grab a fun bite. You can even add a side of caramel or raspberry sauce for dipping to mix up the classic flavor.
Make Ahead and Storage
Storing Leftovers
Leftover S’mores Bars can be stored in an airtight container at room temperature for up to two days, but for the best texture and flavor, refrigerate them where they will stay fresh for up to five days.
Freezing
You can freeze these bars by wrapping them tightly in plastic wrap and then placing them in an airtight container or freezer bag. They’ll keep well for up to three months and thaw quickly at room temperature.
Reheating
For warm, melty bars, gently reheat in the oven at 300 degrees Fahrenheit for 5-7 minutes or microwave individual portions for about 15 seconds. Be careful not to overheat or the marshmallows may toughen.
FAQs
Can I use other types of chocolate for this recipe?
Absolutely! While traditional Hershey bars are classic, feel free to experiment with dark chocolate, milk chocolate, or even chocolate with nuts for added texture.
What can I substitute for graham cracker crumbs?
If graham crackers aren’t available, digestive biscuits or even crushed vanilla wafers make a great substitute that will still give you a tasty crust.
Can I make the bars gluten-free?
Yes, by using gluten-free graham cracker crumbs, this recipe can easily be adapted for a gluten-free treat without sacrificing flavor.
How do I prevent marshmallows from burning under the broiler?
The key is to watch them continuously while under the broiler and remove them as soon as they start turning golden. Every oven is different, so staying close is the safest bet.
Are these bars suitable for storing and gifting?
Definitely! Their sturdy yet soft texture makes them a fantastic homemade gift. Just pack them in a pretty box or tin with parchment paper to keep them fresh and looking delightful.
Final Thoughts
This S’mores Bars Recipe is pure comfort in bar form; it’s simple, fun, and irresistibly delicious. Whether you’re reminiscing about summer campfires or just craving a sweet, nostalgic treat, these bars bring joy to every bite. I can’t wait for you to try this recipe and see how it quickly becomes a favorite in your dessert rotation.
Print
S’mores Bars Recipe
- Prep Time: 10 minutes
- Cook Time: 15 minutes
- Total Time: 25 minutes
- Yield: 16 servings
- Category: Dessert
- Method: Baking
- Cuisine: American
Description
This classic S’mores Bar recipe transforms traditional campfire treats into an easy-to-make, oven-baked dessert perfect for gatherings. A buttery graham cracker crust forms the base, topped with melted Hershey’s chocolate bars and mini marshmallows toasted to golden perfection under the broiler, creating gooey, crispy layers of sweet delight.
Ingredients
Crust
- 2 Cups graham cracker crumbs
- 8–12 Tablespoons melted butter
- 1/2 Cup powdered sugar
Toppings
- 4 Hershey Chocolate Bars (4.4 ounces each)
- 1 package mini marshmallows
Instructions
- Preheat Oven: Set your oven temperature to 350°F (175°C) to prepare for baking the crust.
- Grease Pan: Spray a 9×13-inch baking pan with non-stick butter spray to prevent sticking.
- Mix Crust Ingredients: In a medium bowl, combine graham cracker crumbs, powdered sugar, and melted butter. Stir well with a spoon until fully blended and the mixture resembles wet sand.
- Press Crust: Evenly spread the crumb mixture into the bottom and along the sides of the prepared pan. Use your fingers to firmly press and pack the crust to create a solid base.
- Bake Crust: Place the pan in the preheated oven and bake for 5-8 minutes, or until the edges turn slightly golden brown. This step helps set the crust which will harden as it cools.
- Cool Crust: Remove the pan from the oven and allow the crust to cool completely before adding toppings.
- Add Chocolate Layer: Lay the Hershey chocolate bars evenly over the cooled graham cracker crust, covering as much surface area as possible.
- Melt Chocolate: Return the pan to the oven and bake for about 3 minutes, just until the chocolate starts becoming shiny and begins to melt.
- Cool Slightly: Let the pan cool for 1-2 minutes to prevent the marshmallows from melting upon contact.
- Top with Marshmallows: Place mini marshmallows closely packed on top of the melted chocolate layer, ensuring even coverage.
- Broil Marshmallows: Switch your oven setting to ‘broil.’ Place the pan under the broiler and watch carefully—toast marshmallows for about 2 minutes or until they turn golden brown. Remove immediately to prevent burning.
- Cool Completely: Allow the bars to cool fully. For easier slicing, refrigerate after they reach room temperature to let the chocolate and marshmallow layers set firmly.
- Serve: Use a sharp knife warmed in hot water and dried to slice the bars cleanly, wiping the knife between cuts if needed to prevent sticking. Enjoy your delicious homemade S’mores Bars!
Notes
- The amount of melted butter may be adjusted between 8 and 12 tablespoons depending on how moist you want the crust.
- Watch the marshmallows closely under the broiler as they can burn quickly and potentially catch fire.
- To get clean slice cuts, warm the knife before each cut to reduce stickiness.
- Chilling the bars after baking sets the layers further and makes slicing easier.


